Tron
Stake Tron assets in Vaults
Tron runs on a Delegated-Proof-of-Stake (DPoS) consensus mechanism for energy-efficient validation and near instant settlement. Tron staking supports a stable yield opportunity for institutional users seeking reliable returns on their digital assets. Vaults supports Tron staking using Nobi as the validator. It is fully integrated with warm MPC mobile wallet support for maximum security.
The DPoS consensus mechanism includes the following staking lifecycle:
- Initiate the Staking request for the Tron asset wallet.
- Delegate: Once the Staking request is signed and approved, you can delegate it.
- Bonding Period: Once delegated, staking enters a 1-day bonding period. You cannot claim rewards during this period.
- Claim Rewards: Initiate a Claim to Stake request to claim rewards. Continue claiming rewards in given intervals.
- Unstake: You can unstake (unfreeze) the asset wallet. The unbonding period will take up to 14 days. The unstaked funds in your wallet are inaccessible during this time.
- Withdraw: Once you successfully unstake, you can withdraw the unstaked funds by initiating a withdrawal request. Once the request is signed and approved, you can access the unstaked funds.
Note
- Claiming rewards is a separate action from unstaking. You can claim rewards periodically without unstaking your principal amount.
Initiate Staking Request
Initiate a staking request for a Tron asset wallet in the following steps:
- Sign in to your Vaults account.
- Navigate to Staking from the left navigation menu.
- Enable Staking for Tron wallet:
- Click Start Staking to the right of the header to open the Enable Staking popup.
- Select TRX as the asset.
- Alternatively, you can also:
- Click Stake to the right of the TRX asset to expand it.
- Click + Add Wallet if the asset already has a wallet to open the Enable Staking pop-up.
- Select the required wallet to stake from the dropdown.
- Mark the required checkboxes for Staking Terms of Use.
- Click Enable Staking.
- Enter the required 2FA code to confirm and Continue.
You have successfully enabled staking for the respective Tron wallet. Next, you can start staking by initiating a request to Stake.
Stake Tron Asset
Initiate Request to Stake
Follow the steps below to initiate a staking request for your Tron asset:
-
Click the Stake button next to the wallet asset.
-
Enter the required amount in TRX you want to stake. Click the Max button to the right of the Amount field for the maximum amount allowed to stake for the said asset.
-
Enter any required comment in the Note field.
-
Go through the required notes and validator details. Click Next to proceed.
-
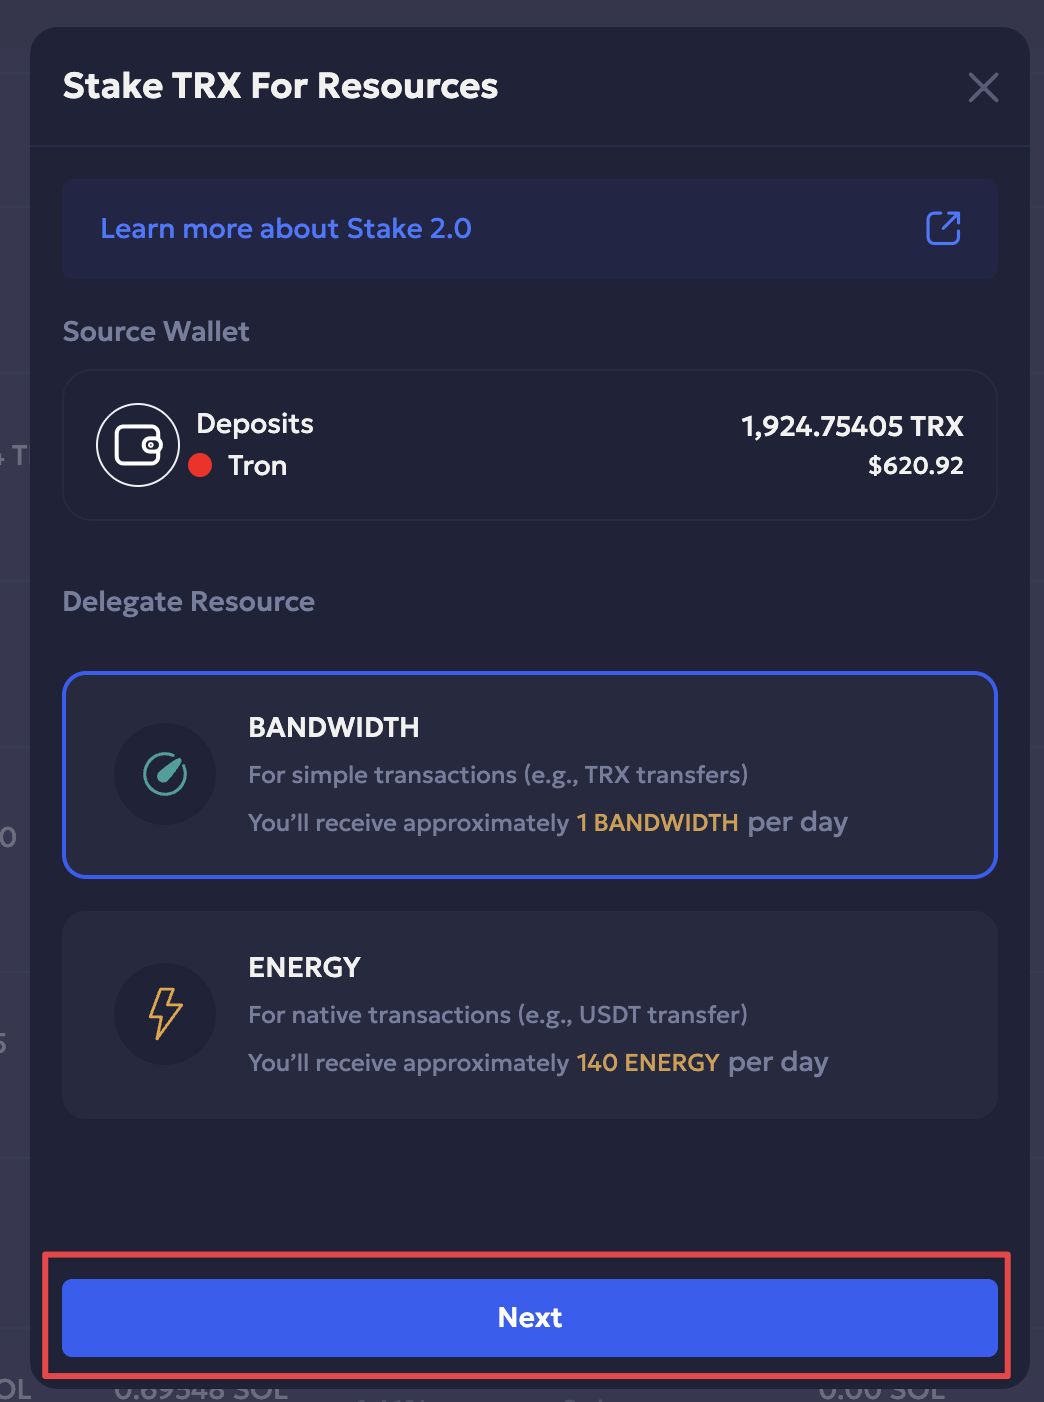
Select Bandwidth or Energy you want to receive as a delegated resource.
-
Verify the staking details. Click Initiate to initiate the stake request.
-
Enter the required 2FA code and Continue.
-
You have successfully initiated a request to stake the Tron asset. Click Okay to confirm.
The validator address is automatically whitelisted when a request to stake is initiated for a wallet for the first time. You can check the Policy tab of the wallet for the Enable Staking type of policy rule.
Approve Request to Stake
Staking initiation requests are recorded in Home > Pending Actions as Staking Stake type. The minimum number of Initiators assigned to the wallet are required to Approve the request to stake the transaction.
- Navigate to Home > Pending Actions.
- Click Approve for the Staking Stake action type.
- Review the security screening details and click Confirm & Approve to proceed.
- Enter the required 2FA code and Continue.
- You have successfully approved and signed the transaction. Click Done.
Sign Transaction
A minimum number of approved Signers need to approve and sign the Tron staking transaction via the Vaults Mobile. On Vaults web, the request remains in Pending Actions with Signing status.
- Sign in to Vaults mobile.
- Navigate to Actions.
- Click the Stake - Stake card to review details.
- Click Approve to approve and sign the transaction.
- The transaction is approved and signed successfully. It now has a Send status. Click Done.
The transaction is successfully recorded in History for further reference.
Delegate Tron Asset
Tron blockchain uses bandwidth and energy resources for transactions instead of fixed Gas Fees. Hence, once the Tron asset is staked, it delegates the resources to the wallet address you are staking.
Initiate Tron Delegation Request
- Click Delegate next to the Tron asset wallet to initiate the delegation request.
- Click Initiate to confirm the delegation request.
- Enter the required 2FA code and Continue.
- You have successfully initiated a Tron delegation request. Click Okay to confirm.
Approve Tron Delegation Initiation
The Tron delegation request is recorded in the Pending Actions panel as a Staking Delegate type. The assigned minimum number of Initiators need to approve the Tron delegation request.
Refer to the Delegate Tron guide for more details on Tron asset delegate
- Navigate to Home > Pending Actions.
- Click Approve next to the Staking Delegate action request.
- Review the transaction details. Click Confirm & Approve.
- Enter the required 2FA code and Continue.
- You have successfully approved and signed the transaction. Click Done.
The Staking Delegate action changes its status from Initiating to Signing in Pending Actions.
Sign Tron Delegation Initiation
Once the delegation initiation request is approved, the minimum number of Signers are required to approve and sign the transaction.
- Sign in to Vaults mobile.
- Navigate to Actions.
- Click the Stake - Delegate card to review details.
- Click Approve to approve and sign the transaction.
- The transaction is approved and signed successfully. It now has a Send status. Click Done.
The signed delegation transaction is recorded in History. Once delegated, Staking enters a 1-day bonding period. You cannot claim rewards during this period.
Claim Rewards
You can start to claim the accumulated rewards post-delegation and the bonding period.
Initiate Request to Claim
- Click Claim next to the Tron asset wallet.
- Click Initiate.
- Enter the required 2FA code and Continue.
You have successfully initiated a staking claim transaction. Click Okay.
Approve Claim to Stake
Requests initiated to claim staking rewards are recorded in the Pending Actions as a Staking Claim action type. The minimum number of Initiators are required to approve the Staking Claim request.
- Navigate to Home > Pending Actions section.
- Click Approve to approve the Staking Claim initiation request.
- Click Confirm & Approve to confirm the transaction.
- Enter the required 2FA code and Continue.
- You have successfully approved and signed the transaction. Click Done.
Sign Claim to Stake
The minimum number of Signers are required to approve and sign the transaction.
- Sign in to your Vaults Mobile account.
- Navigate to Actions.
- Click the Stake - Claim Rewards card to review details.
- Click Approve to approve and sign the transaction.
- The transaction request to claim rewards is approved and signed successfully. It now has a Send status. Click Done.
The signed transaction is recorded in History.
Unstake & Withdraw Tron Asset
You can unstake a Tron asset after its bonding period. Unstaking means unfreezing the locked asset and then withdrawing the unstaked funds from the wallet. The unbonding period will take up to 14 days.
Unstake Tron Asset
Follow the steps to unstake a Tron asset wallet:
- Click Unstake next to the Tron asset wallet.
- Click Unstake, enter the amount, and an optional note.
- Click Next, enter your 2FA
- Approve and sign the unstake request via mobile.
- The request will be processed and will enter a 14-day unbonding period.
Withdraw Tron Asset
Once you successfully unstake, you need to request a withdrawal to access your unstaked funds.
- After unbonding is complete, click Withdraw > Initiate.
- Enter your 2FA and sign in on mobile.
- Your staked funds will be transferred to your wallet.
Updated about 1 month ago