Transfer funds
Send and receive transfers.
Users can create new transfers to send/ receive funds to/ from external addresses, or internally across Vaults’ accounts.
Send
Owners and Admins can send funds to external or internal exchanges, whitelisted or Vaults wallet addresses by initiating a Send (outgoing) transaction request. Send transaction requests that support both native coins and tokens from MPC and Multisig wallets.
Send transactions support the following webhook payload notifications:
MPC Send Transaction Lifecycle
An MPC Send transaction goes through the following stages:
- Transaction Initation:
- Initiators (Owners and Admins) who are part of the transaction initiation team can initiate an MPC transaction using the Send button.
- The Initiator team defines which members can send a transaction request from the wallet.
- Initiators can send transactions from both the Vaults Web and Mobile applications.
- MPC configuration supports 2-of-2 initiation, with a minimum of at least one initiator approval.
- Transaction Initiation Approval:
- Initiators (Owners and Admins) who are part of the Initiation team can approve a transaction initiation request.
- Initiation approvals are supported both in the Vaults Web and Mobile applications.
- The Initiator team members are authorised to review and approve the transaction request to be sent from the wallet.
- MPC configuration supports 2-of-2 initiation, with a minimum of at least one initiator approval.
- Transaction Signing:
- Signers (Owners and Admins) who are part of the transaction Signing team can sign and approve an outgoing MPC transaction request.
- Transaction signing is supported via Vaults Mobile only.
- The Signing team defines the members authorised to sign outgoing transactions from the wallet.
- MPC configuration supports 2-of-2 signing, with a minimum requirement of at least one signer's approval.
Note
Ensure you have configured the required initiation, approval, and signing configurations for your MPC wallet during its creation.
Auto Expiration for Tron Transaction
Vaults supports an additional auto-expiry window for Tron MPC and Multisig transactions when sending funds. The auto-expiration feature encourages seamless transaction initiation and signing approvals, facilitating faster completions. It supports a countdown Timer to indicate a transaction’s completion urgency and automatically expires incomplete transactions post the 24-hour window.
The Auto Expiration reminder is supported throughout a Send transaction’s lifecycle for Tron chains.
-
During Transaction Initiation
-
For Pending Transactions
Pending Tron transactions have an additional countdown timer indicating transaction completion urgency.- Navigate to Home > Pending Actions.
- Pending Send transactions for Tron have an additional timer.
- The respective transaction Details panel has a countdown timer. Click View to bring up the panel.
-
Automatic Expiration
If the transaction is not yet approved or signed by all members within the 24 hours signing window, it is considered expired.- Expired transactions have a Rejected primary transaction status.
- The rejected transaction is recorded in the Transaction History for reference.
Demo
Receive
Owners and Admins can receive funds from either external or internal exchange, whitelisted or Vaults wallet addresses by initiating a Receive (incoming) transaction request. Receive transaction requests support both native coins and tokens from MPC and Multisig wallets.
Receive transactions support the following webhook payload notifications:
- Completed webhooks for incoming transfers from single or batch (multiple) addresses.
- Periodic webhooks for continuous incoming transfers from single addresses.
Transaction Navigation
You can navigate to the Send and Receive buttons across Vaults to create transfers as required.
Vaults Web
-
Log in to the Vaults web account.
-
Home page: Click either theReceive or Send button in the top-right corner of the Home page to open the respective transaction flow.

-
Wallets
-
Click Wallets from the main navigation menu to navigate to the wallet overview.
-
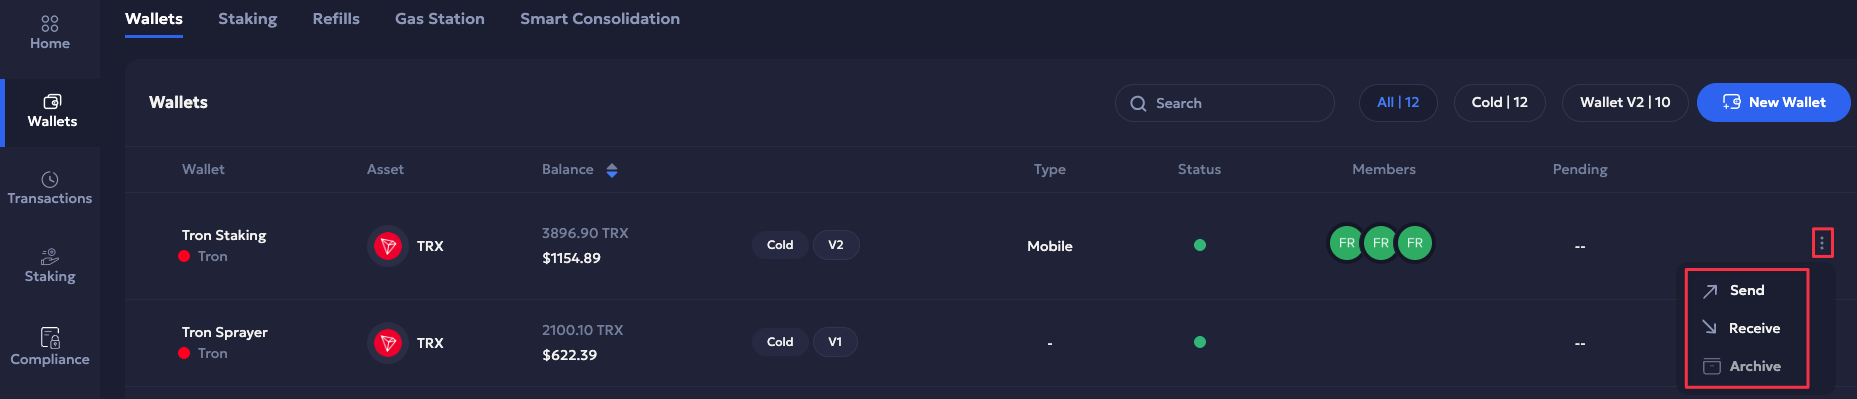
Navigate to the right of a respective wallet and click the three-dot Actions menu.
-
Click either Receive or Send to open the respective transaction flow.
-
-
Wallet Details
-
Navigate to Wallets from the main navigation menu.
-
Select a respective wallet to navigate to the Wallet Details page.
-
Click either Receive or Send to the top-right of the page header to open the respective transaction flow.

-
Vaults Mobile
- Log in to your Vaults mobile account.
- Portfolio: Tap either the Receive or Send buttons to open the respective transaction flow, or
- Wallets:
- Navigate to the Wallets tab.
- Select a wallet.
- Tap either the Receive or Send buttons to open the respective transaction flow.
Create a Transaction
Refer to the following guides to create a transaction:
- Transfer funds from a warm MPC wallet to,
- Send funds from an MPC Mobile wallet.
- Receive funds in an MPC Mobile wallet.
- Transfer funds from a multisig wallet.
- Send funds from a Multisig wallet.
- Receive funds in a Multisig wallet.
Updated 3 months ago