
Verifying the Signing Message on your Hardware Device (For EVM Chains Only)
Blind Signing Protection
Blind signing in multisig wallets refers to signing a transaction on your hardware device without being able to review the transaction details before approving the transaction.
With Blind signing protection, you can now verify the transaction by reviewing the domain hash and message hash. These values are displayed on the device and signers can cross-verify these messages on their hardware devices with Gnosis Safe UI.
⚠️ This step reduces the risk of signature mismatch and eliminates accidental or malicious approvals of transactions trying to drain your wallet.
All signers including the first signer can independently verify the message hash and domain hash values seen on the hardware device with the values on the screen, ensuring that transactions are not tampered with.
The second signer can cross-check the message hash, domain hash, safe transaction hash, input data, and other transaction parameters, such as balance changes on the Gnosis Safe UI or a third party safe utils tool to verify transactions
Prerequisite: Enable blind signing in your Ledger device
- Connect and unlock your Ledger device.
- Open the Ethereum application.
- Press the right button to navigate to Settings. Then press both buttons to validate.
- In the Blind signing settings, press both buttons to enable blind signing in transactions. The device displays Enabled.
Refer to the Ledger website to learn more.
Verify signing messages on Ledger
Once a transaction is initiated (signed by the first signer), as a second signer or a consequent signer, perform the following steps to verify signing messages and sign a transaction.
- Log into Vaults.
- On your Home, under Pending Actions, select View for a transaction pending signature and click on Approve.
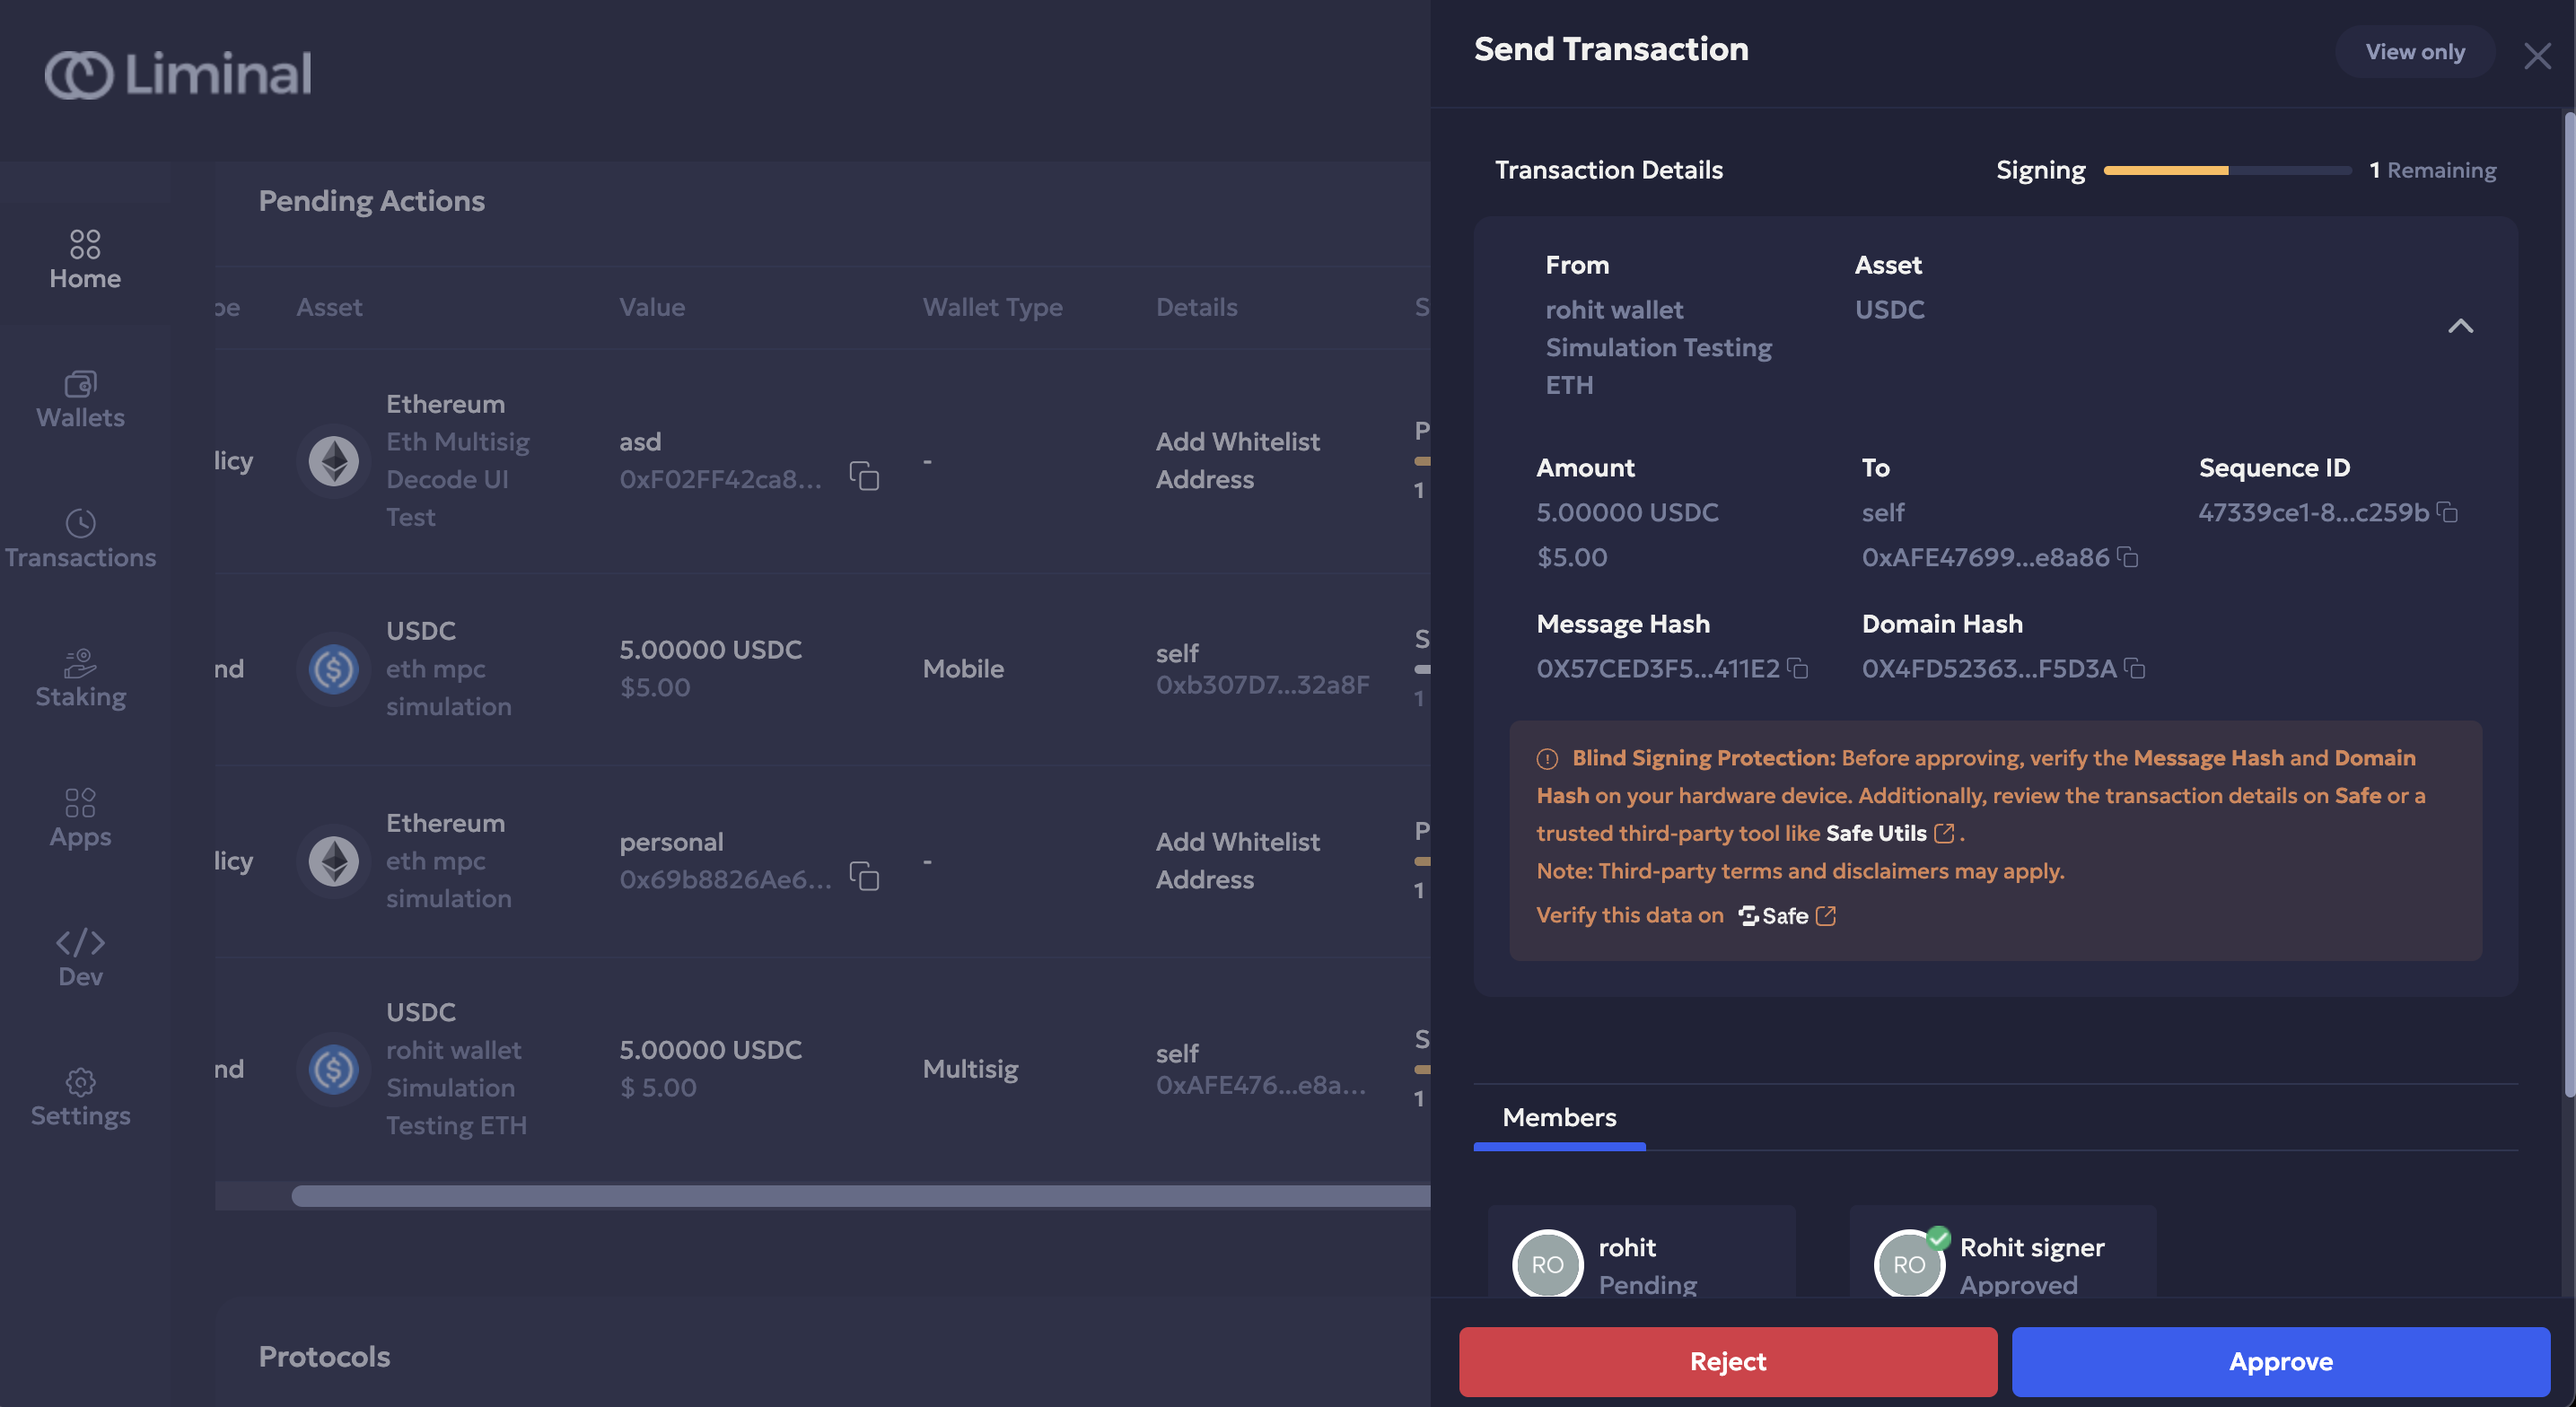
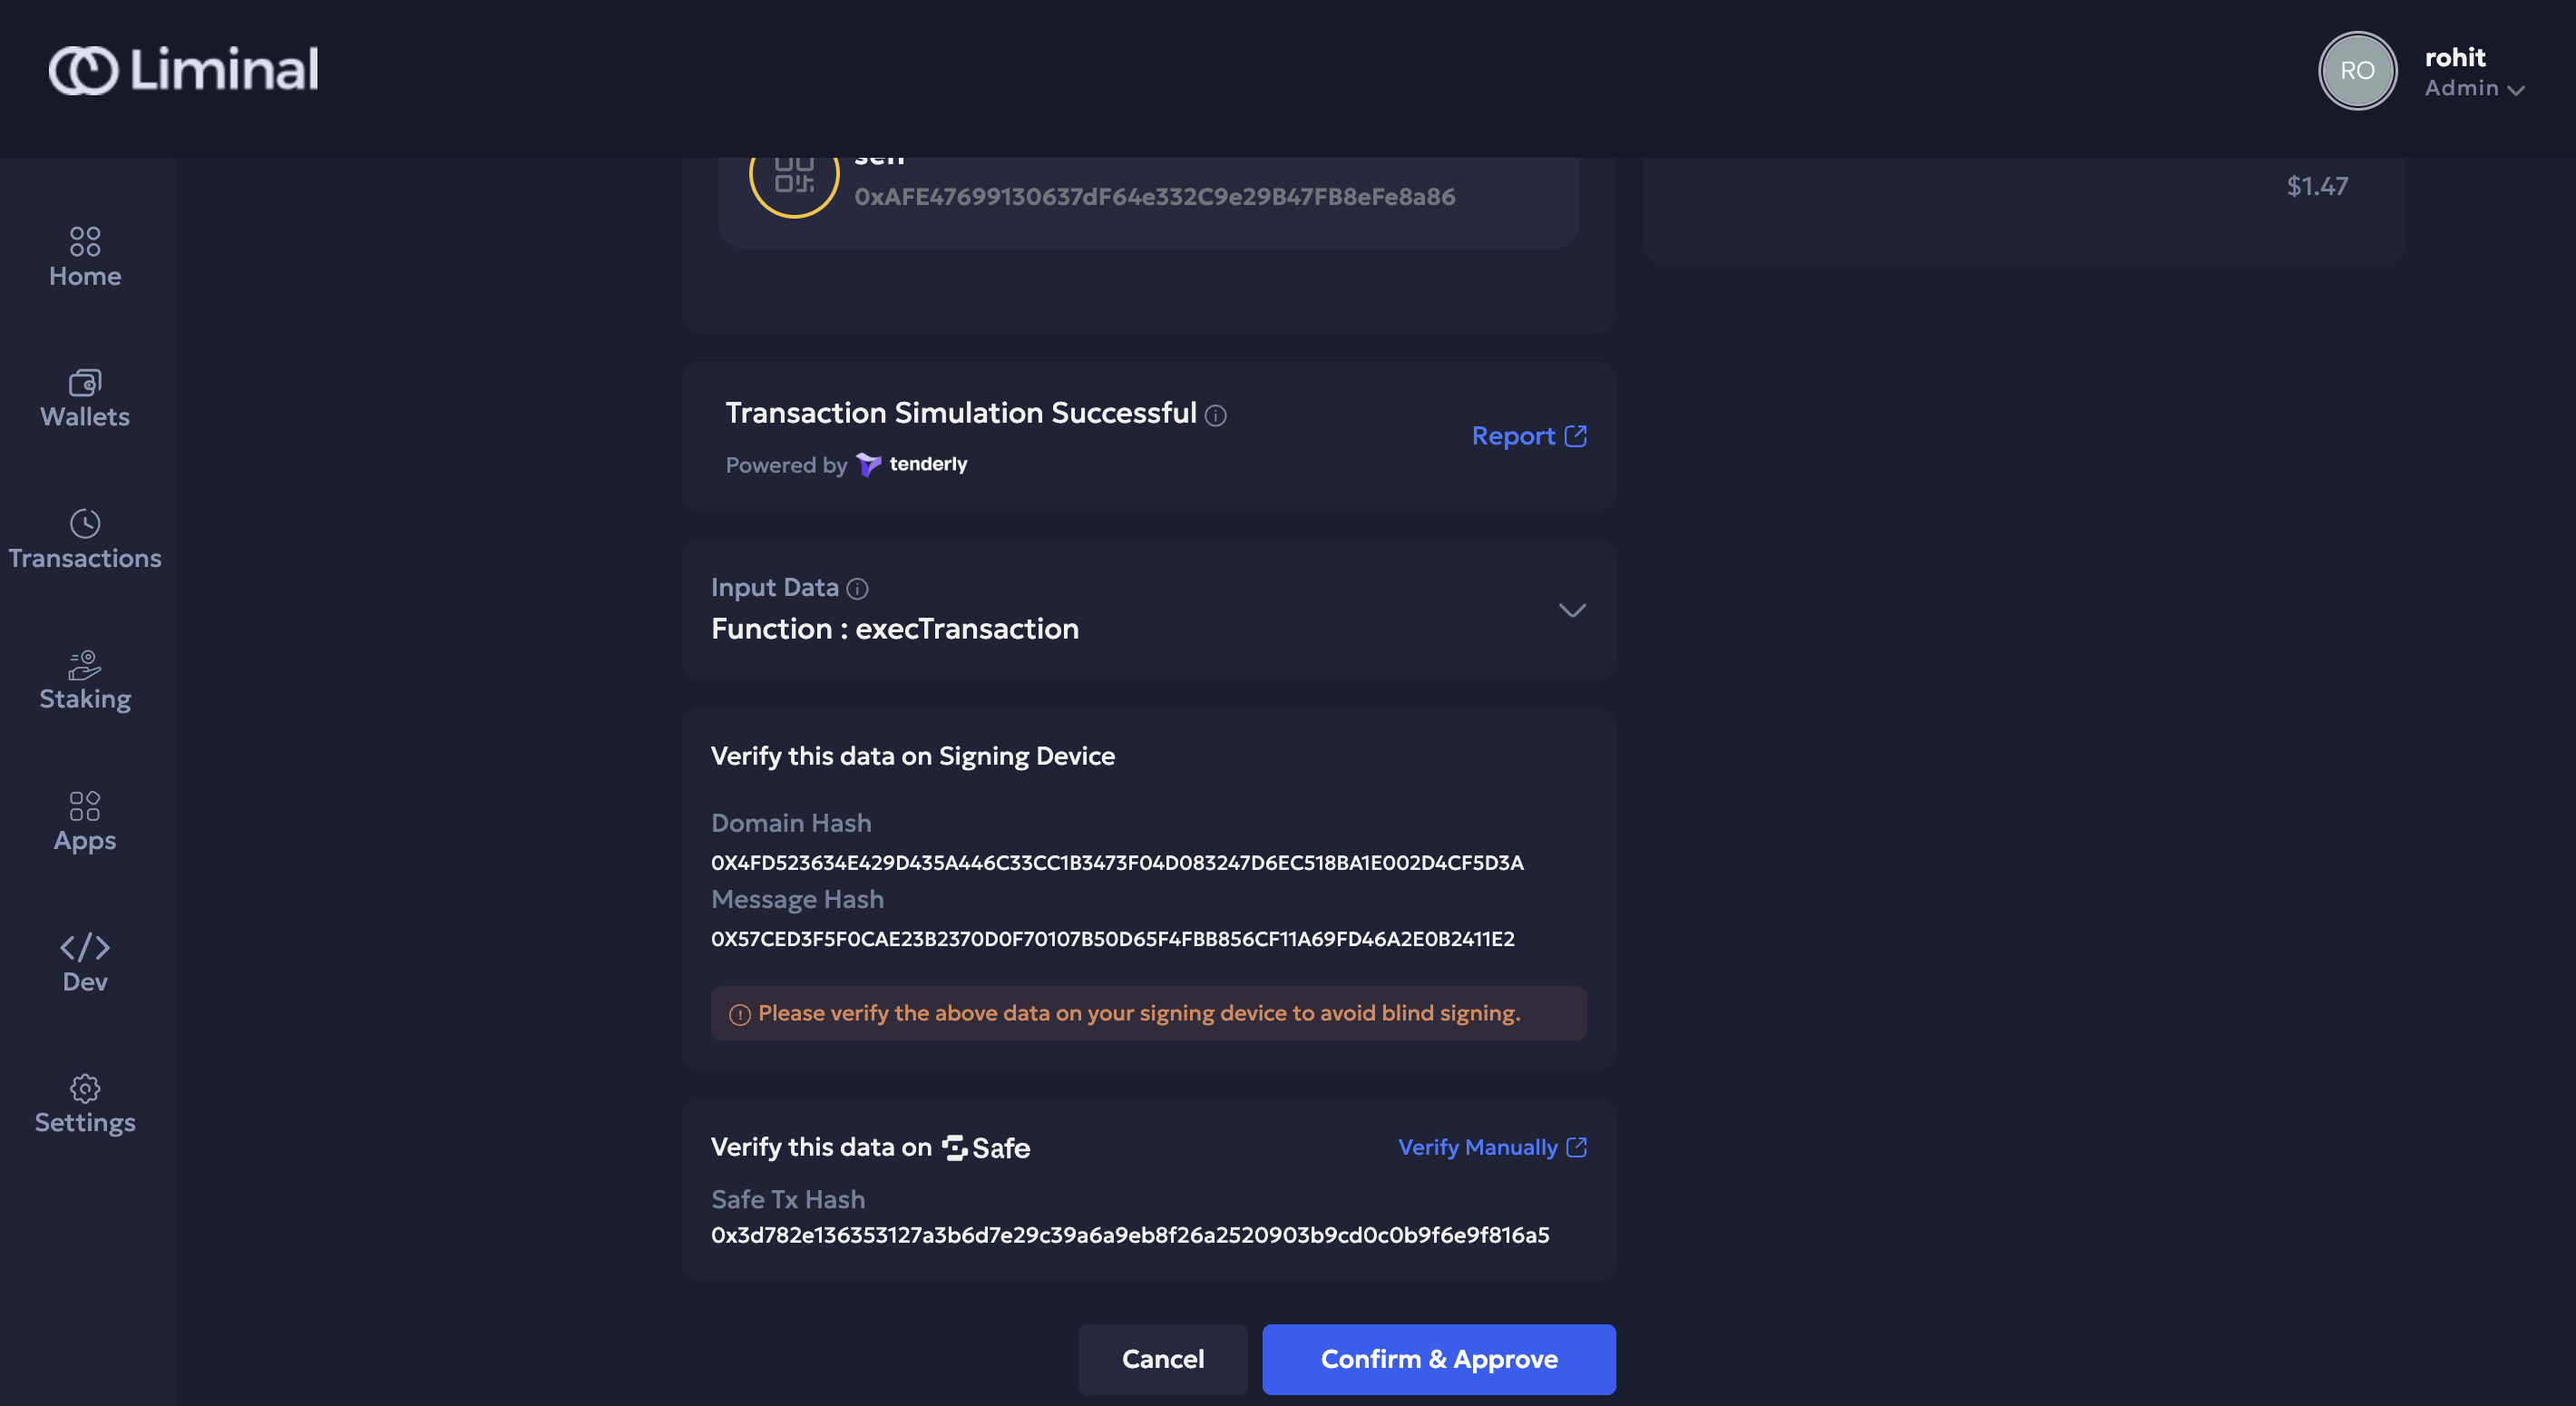
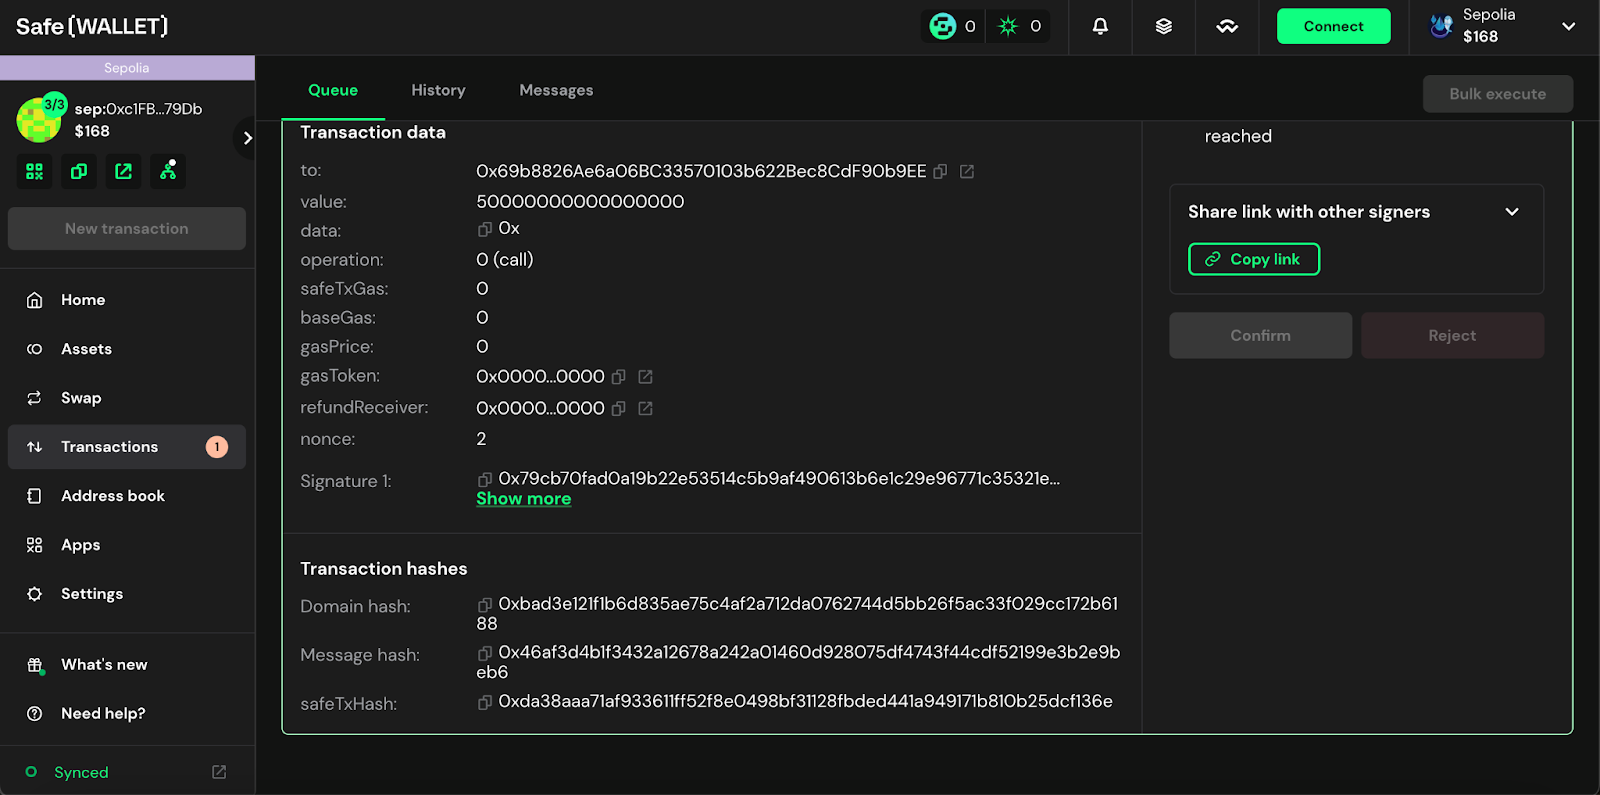
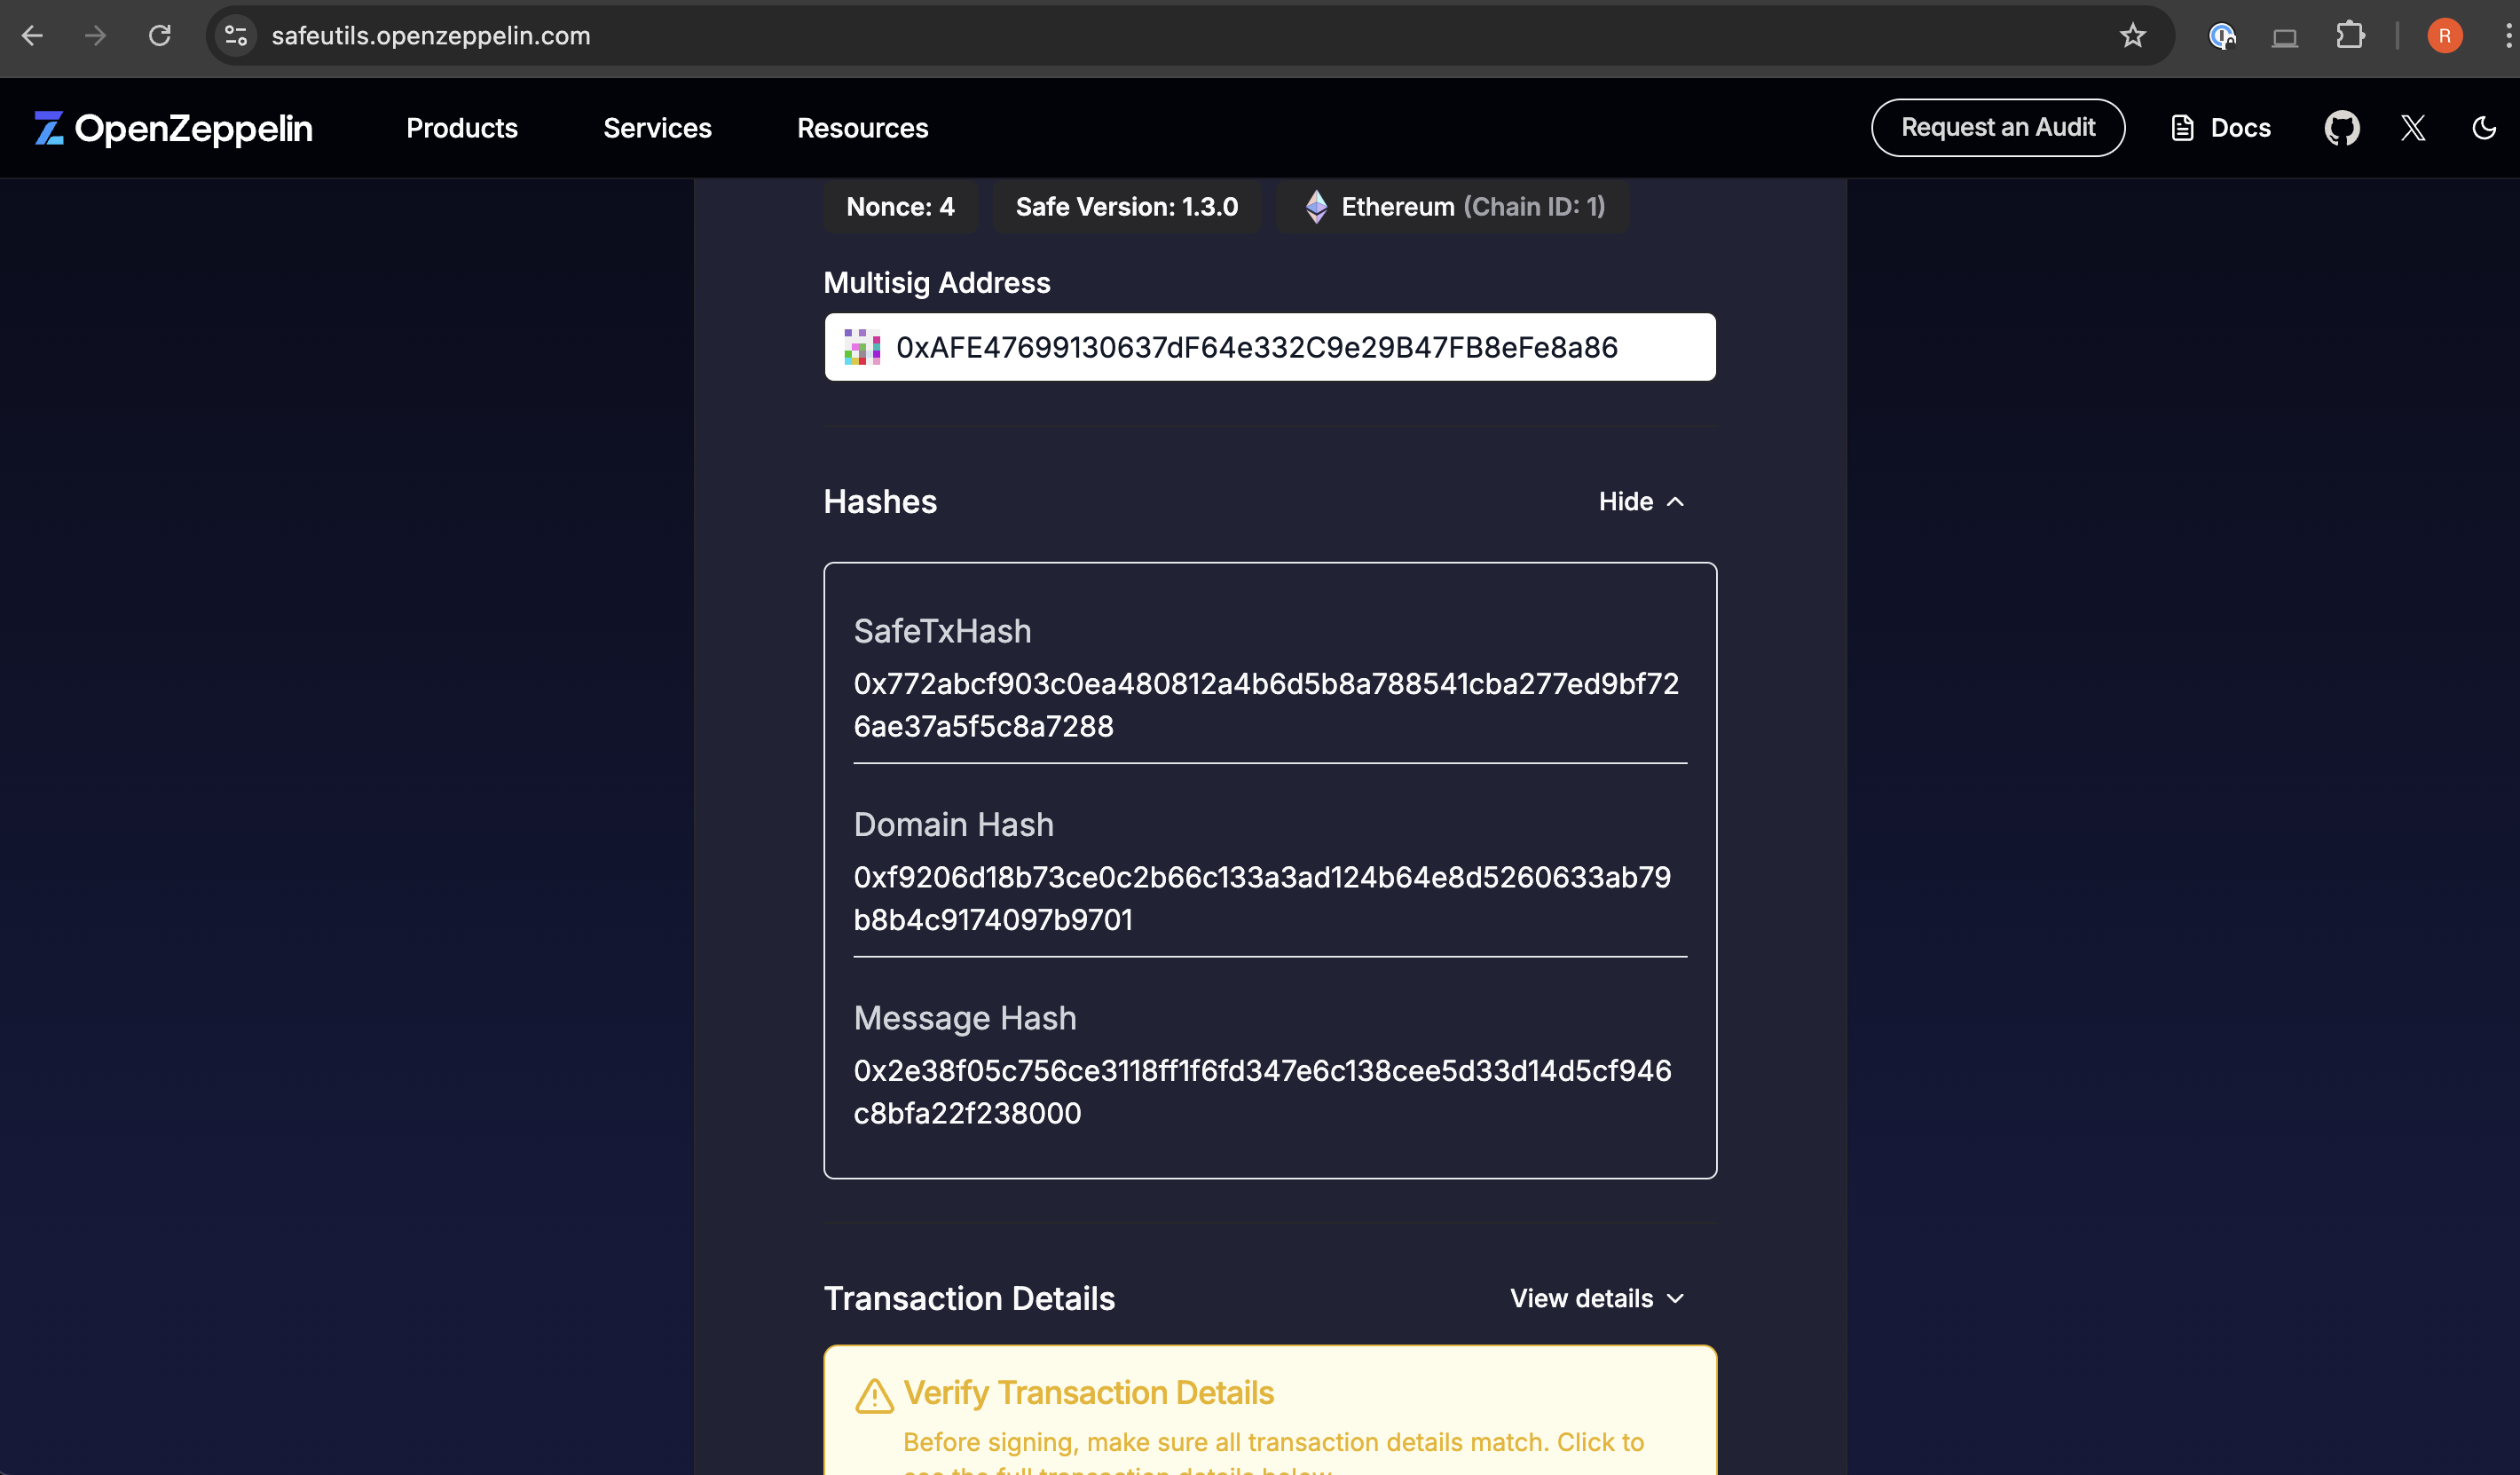
- After verifying the input data and tenderly simulation report scroll down to components showing the Message Hash, Domain Hash and Safe Tx Hash.
- Select the Safe link to go to the Safe UI. You will see the queued up transactions on the Safe dashboard.
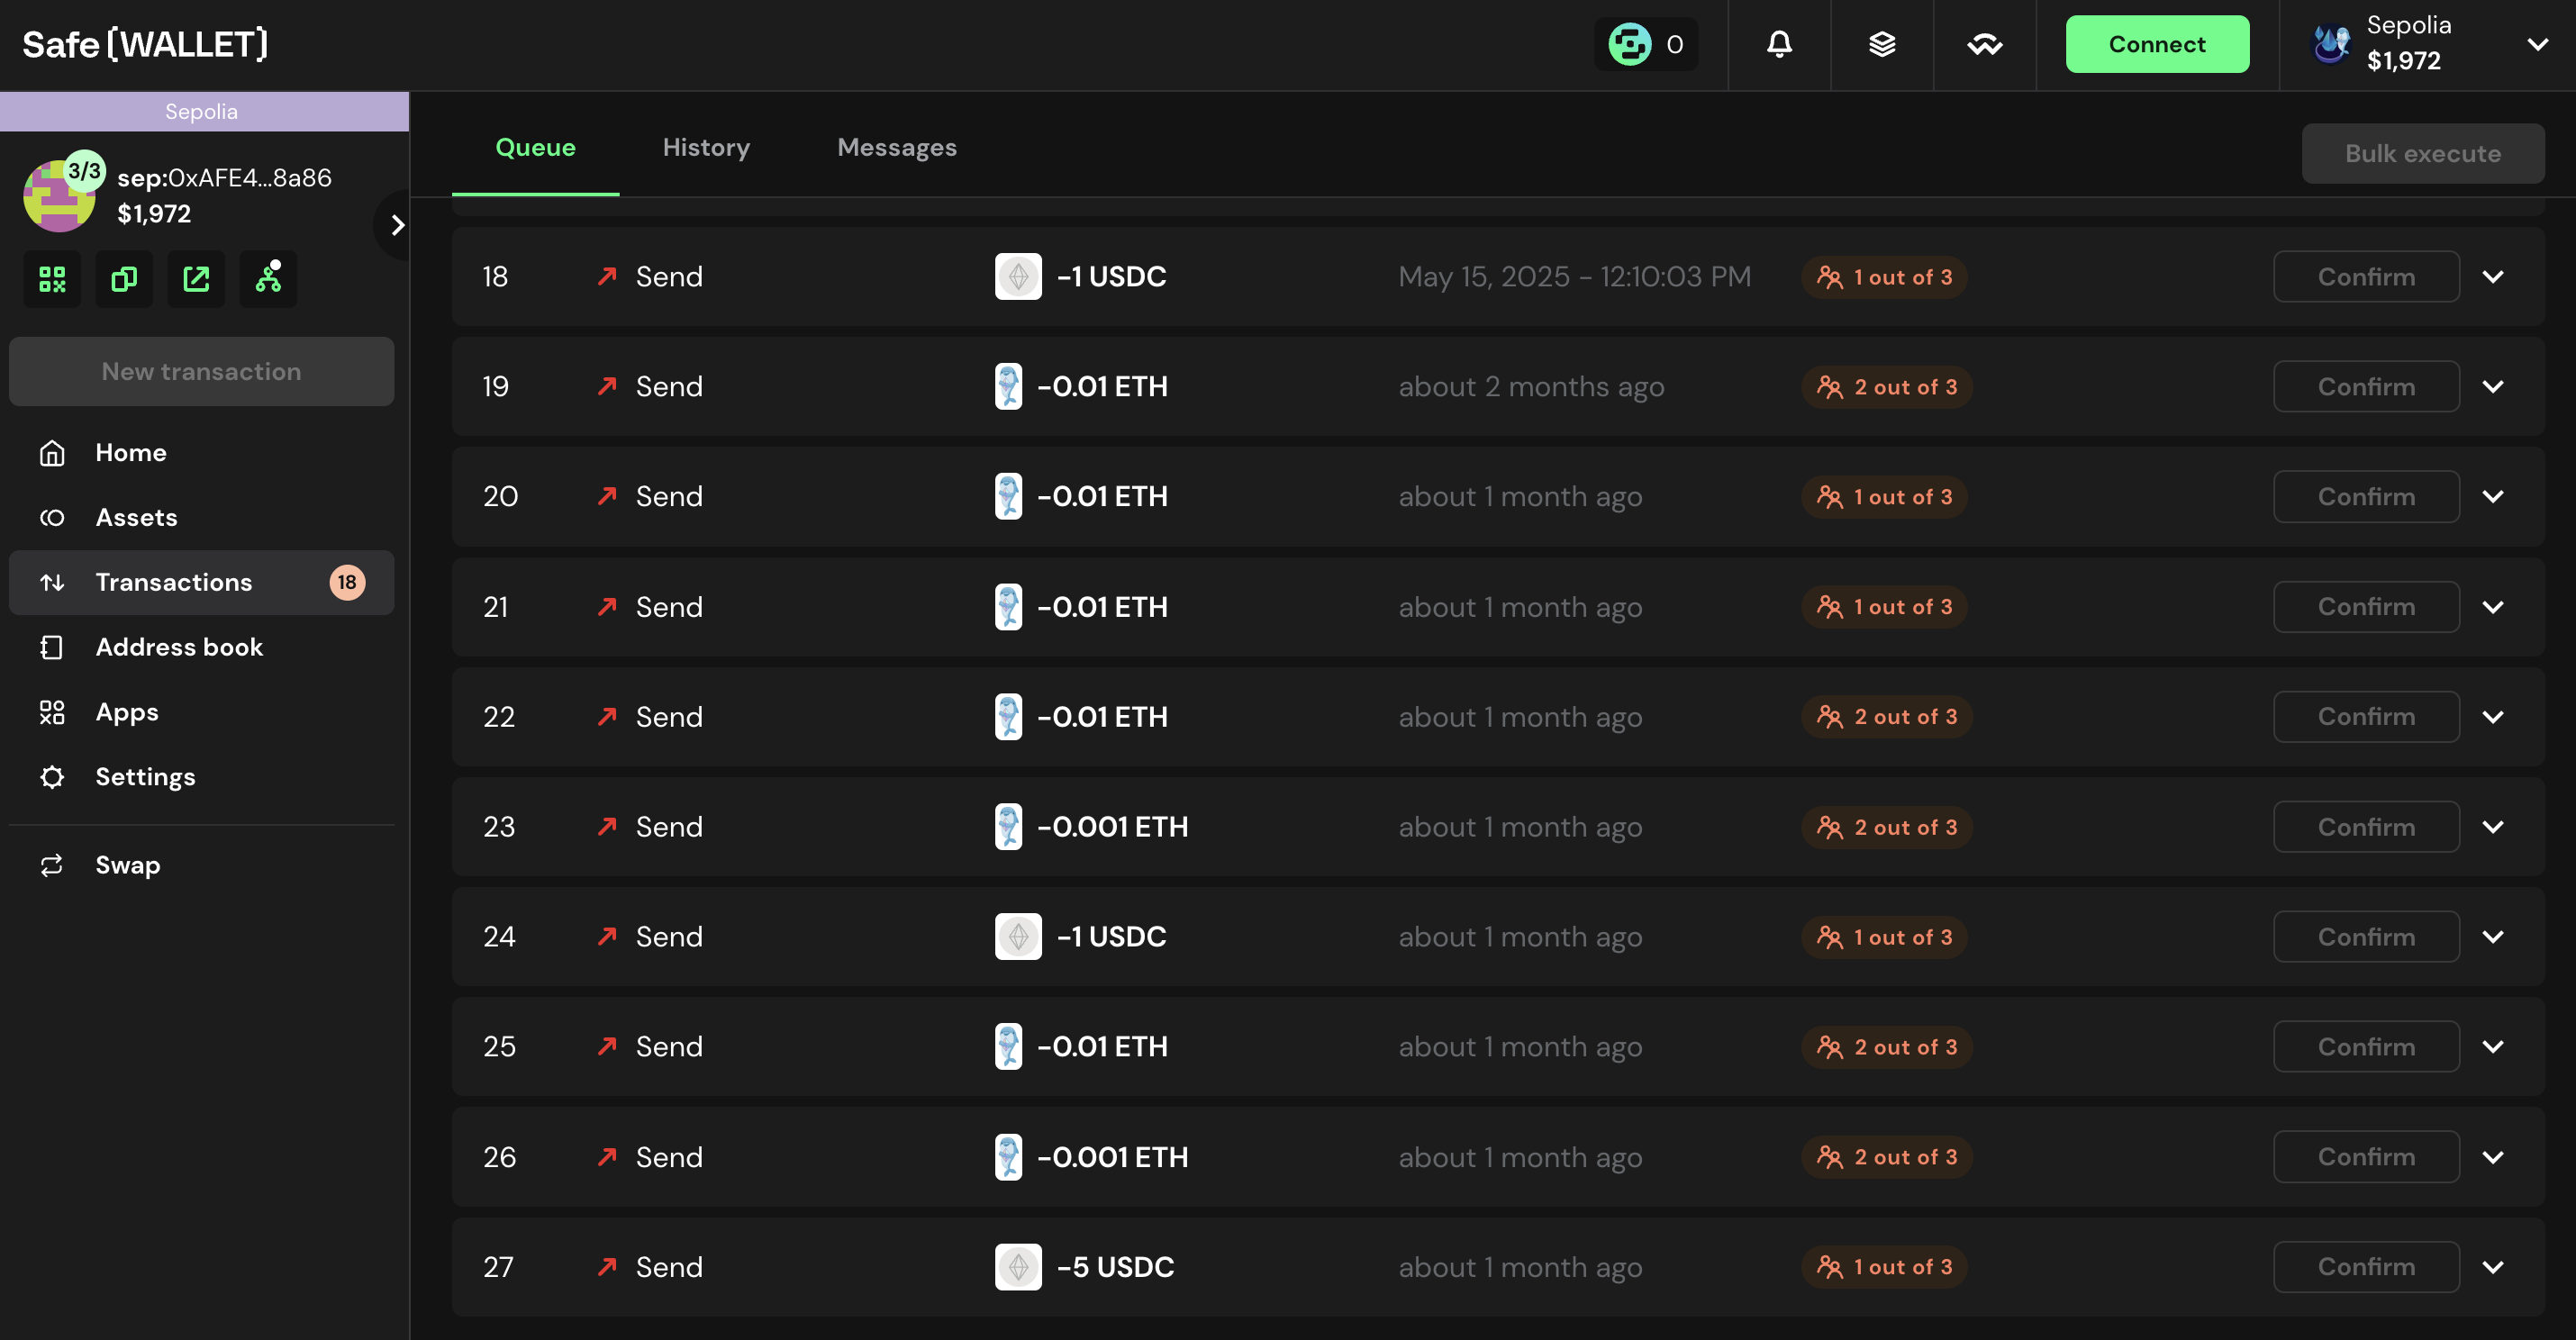
- Select the transaction to expand its details. Verify the transfer amount (eg. 5 USDC in the screenshot below) and then select Advanced details.
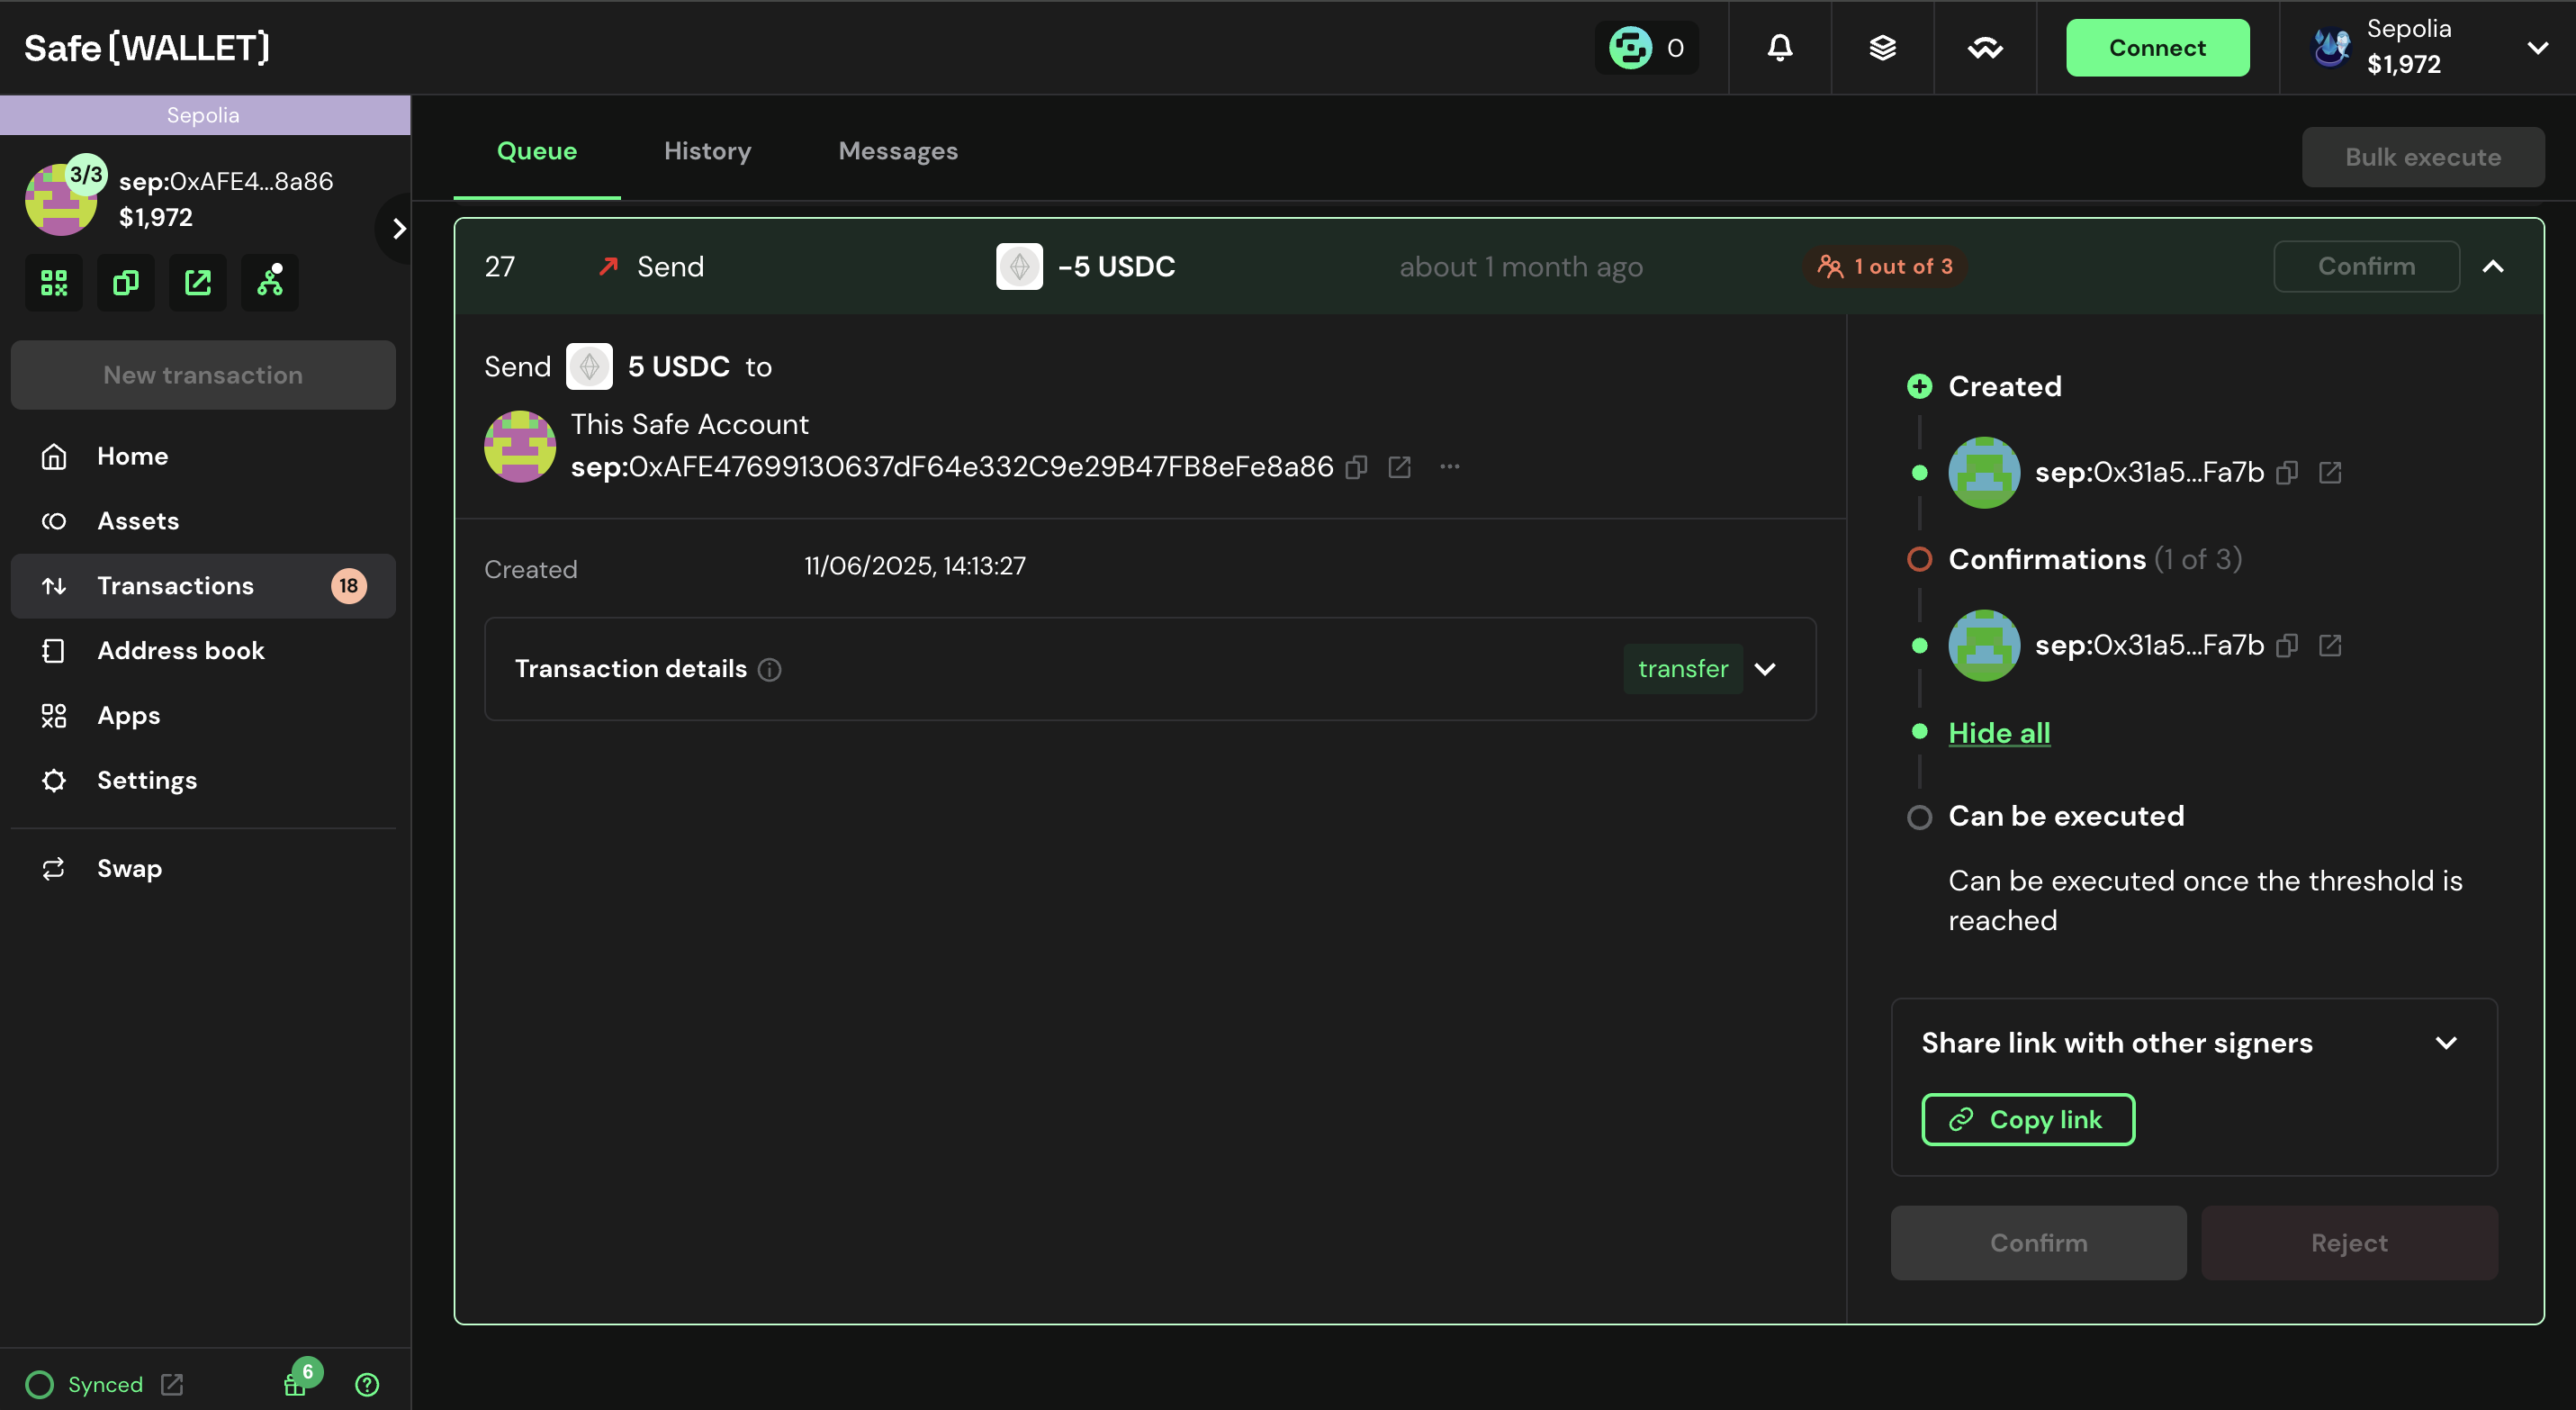
- Scroll down and click on hashes to view the domain hash, message hash and safeTxHash values.
- Go back to Liminal Vaults and select Confirm and Approve.

- If your ledger is connected the transaction will be shown on your ledger to sign.
Ensure that both domain and message hash values in the Ledger device match the values given on the Safe UI as well as the one shown in Liminal. Once verified, sign the transaction to confirm it.
Additional Manual Verification
You can also generate the Message hash and Domain Hash manually by inputting the transaction details in a safe utils application. You can also cross verify this message hash and domain hash on the ledger device before signing the transaction.
⚠️ Manually Generating the Message Hash and Domain Hash is highly recommended
Follow the steps below to correctly generate the Message Hash and Domain Hash on safe utils
- Input Basic Transaction Information
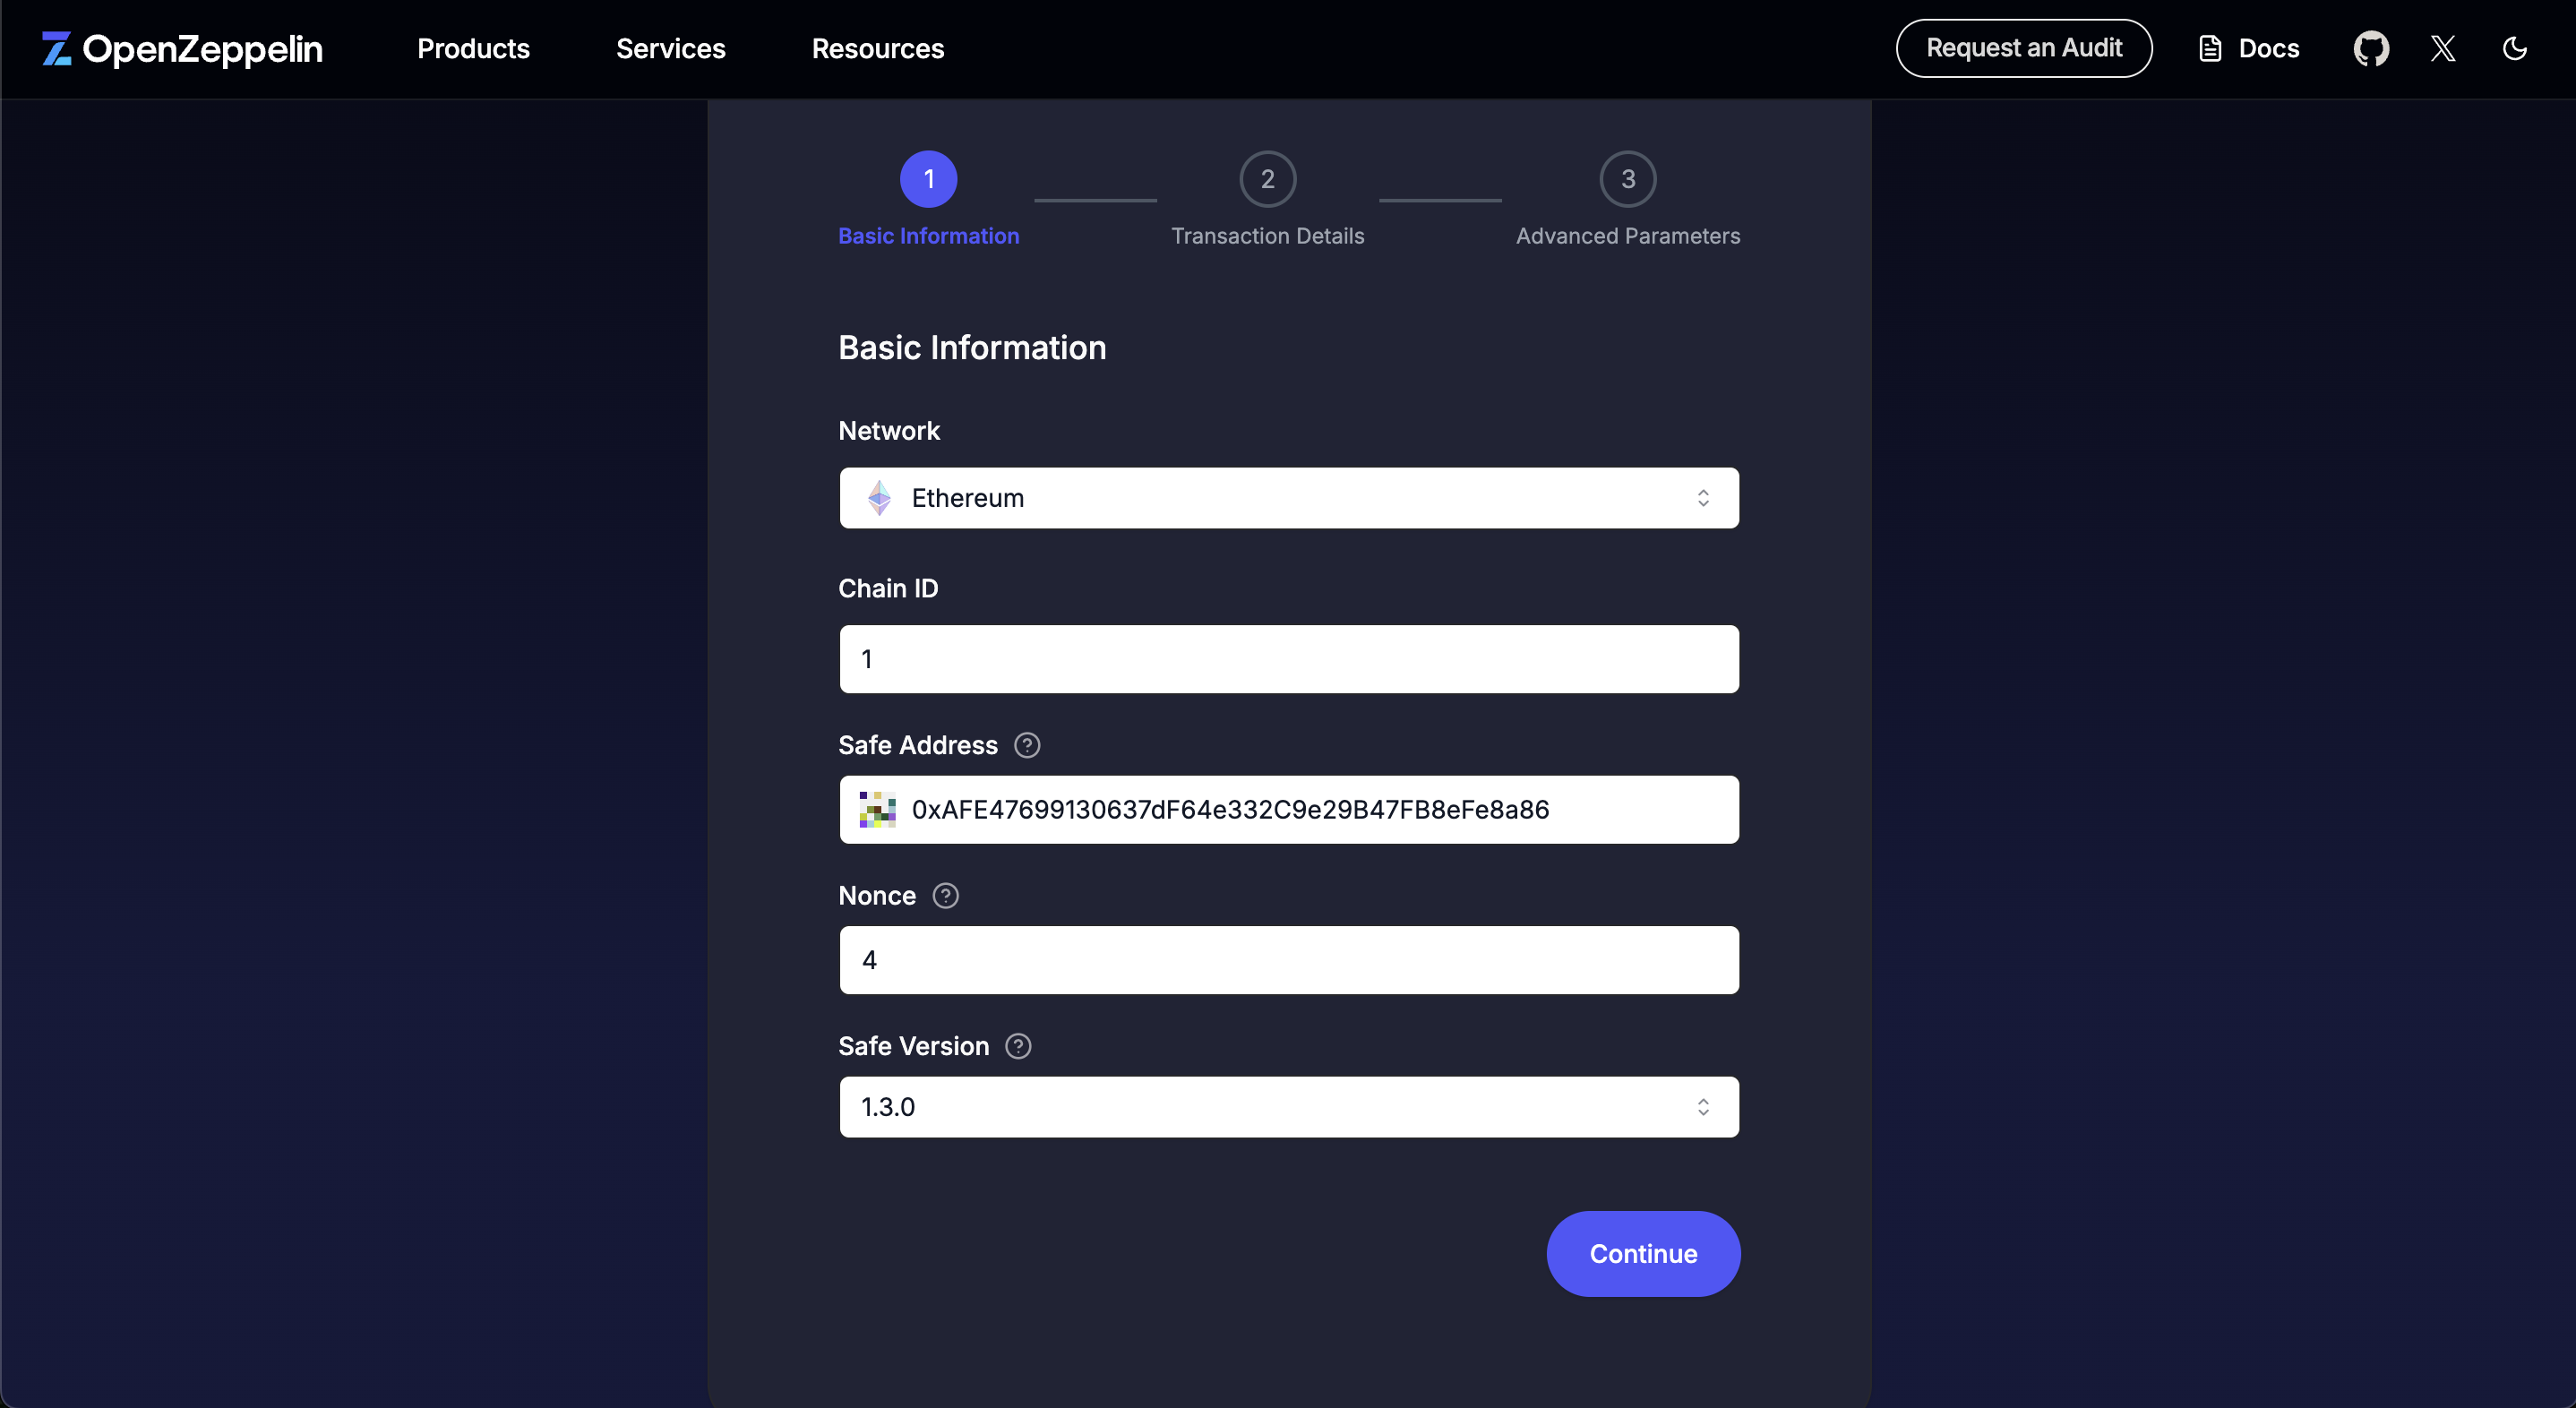
- Select the Network (Chain) on which you are transferring funds eg. Ethereum , Avalanche etc.
- Chain ID will get auto-populated.
- Enter the Address from which you are transferring the funds. This is the 'From Address'. You can get this from clicking the Receive Button from the Wallet Details page on the Vaults web application.
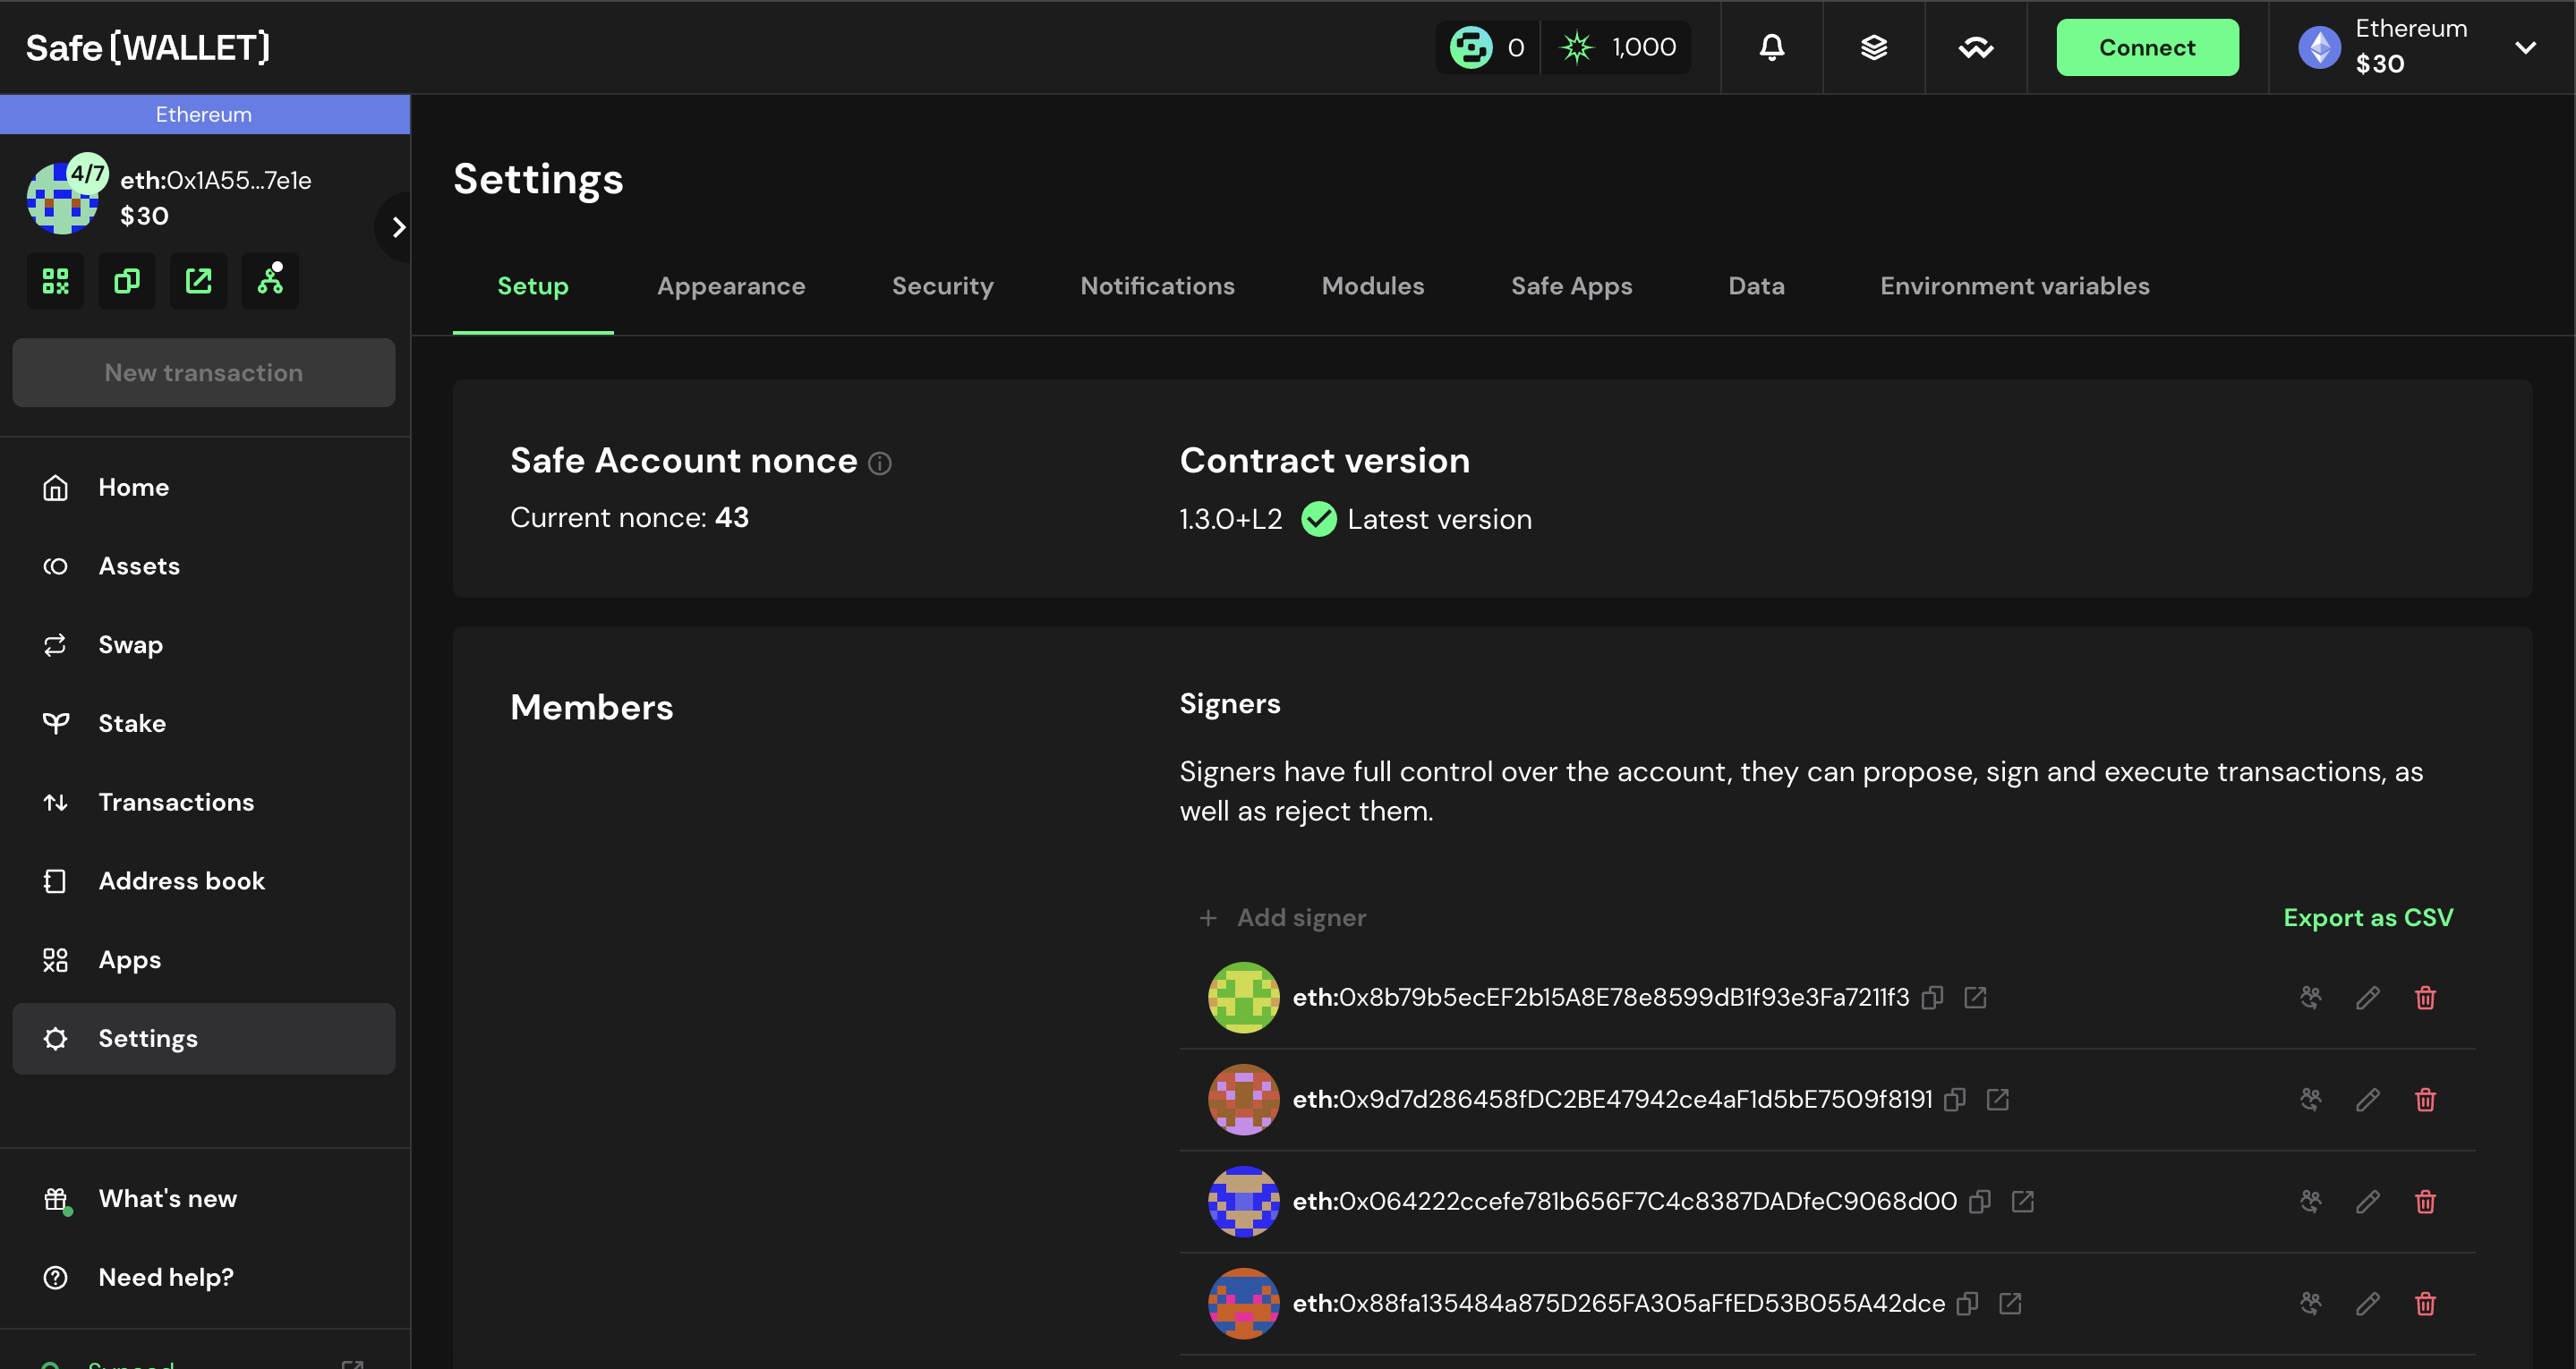
- The Nonce value can be obtained from the Safe Website as shown below. In this example link replace the address and network prefix to access your safe wallet details. Navigate to settings and check the current nonce value. The nonce for the next transaction will be incremented by 1. i.e. in this case 44.
Note:
- If you have queued transactions then the latest nonce needs to be picked up from the queued transactions in the Transactions tab and then add 1 to it
- Input Transaction Details
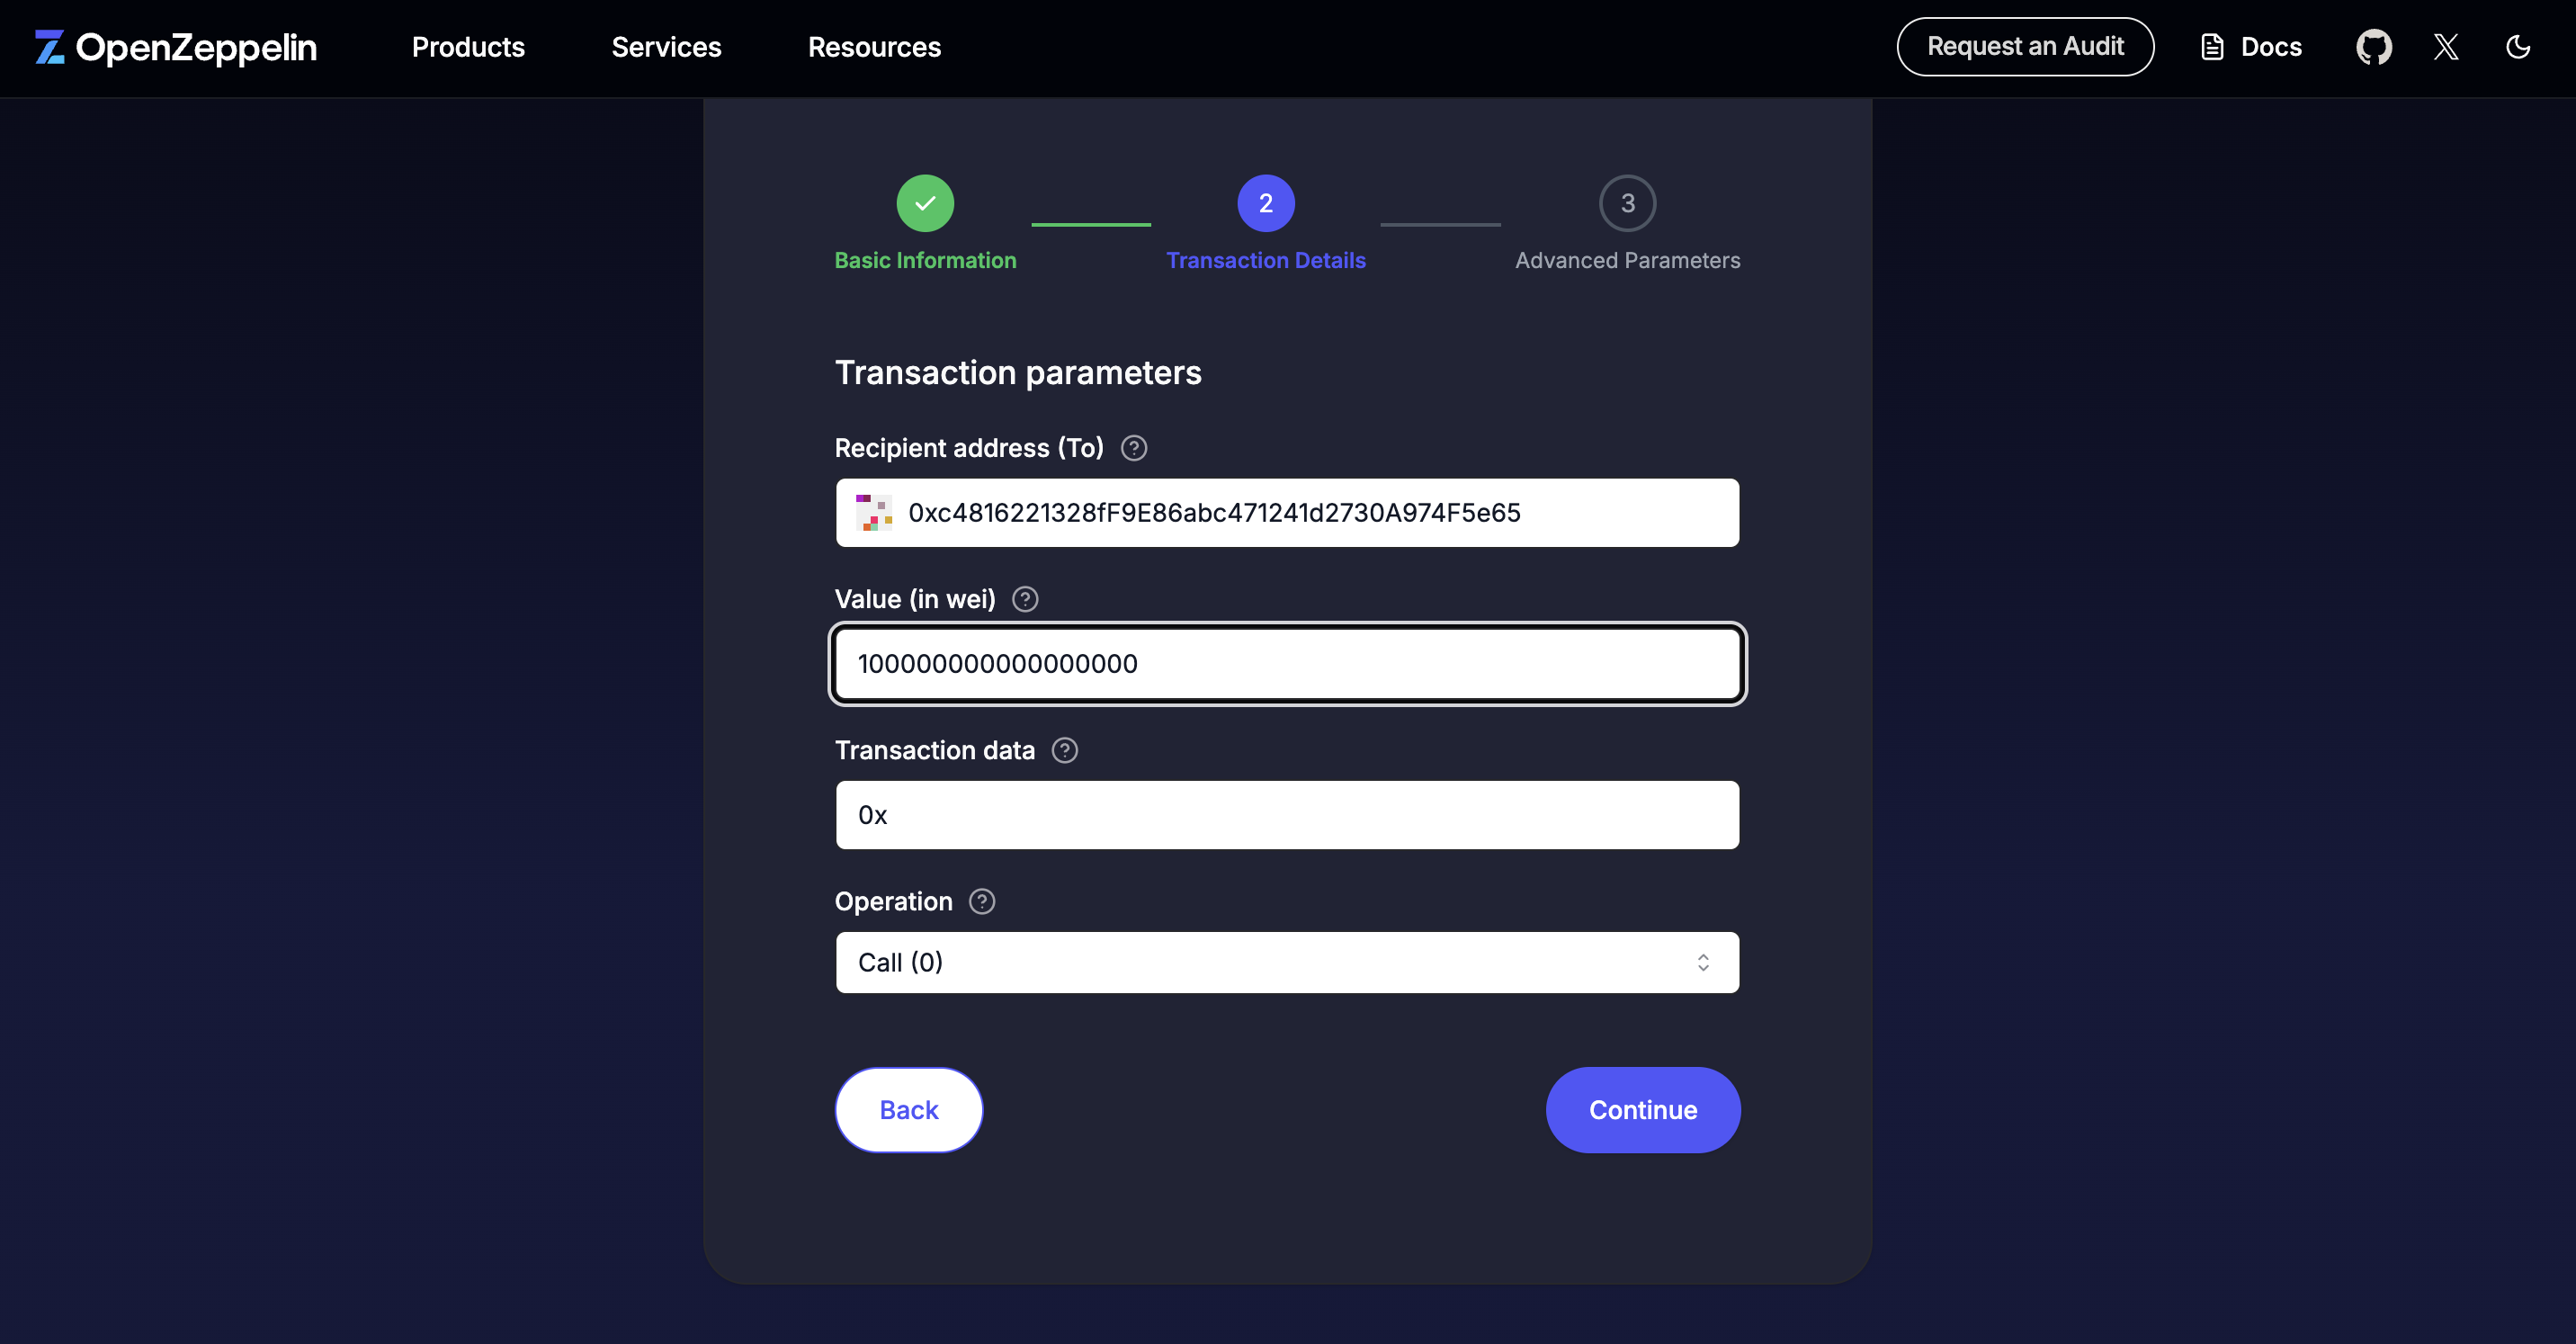
- Input the Recipient Address. This is the 'To Address' you are sending funds to.
- Input the transaction value (in Wei). In order to convert ETH to wei or any other currency to wei, you can use any similar converter available online.
- Transaction data is the raw data that goes as input to the blockchain. This will be '0x' for native transactions. For token transactions such as USDC, USDT, DAI, below steps need to be followed to create the transaction data.
- Since we are invoking the transfer function the function selector is transfer(address, uint256). Converting to hex value we get
0xa9059cbb. - Remove
0xfrom the To Address and left-pad it with enough 0's to make it 64 characters (32 bytes). Eg. if To address is 0x51c29314e3275b49213675a466819ed6d81244e0 then the formatted value is00000000000000000000000051c29314e3275b49213675a466819ed6d81244e0 - Convert the transfer amount to the lowest denomination. i.e. If the transfer value is 20 USDC , then the value in lowest denomination is 20 * 10^6 = 20000000.
- Convert to hexadecimal and left pad it to make it 64 chars ->
0000000000000000000000000000000000000000000000000000000001312d00 - Lastly, concatenate everything ->
0xa9059cbb00000000000000000000000051c29314e3275b49213675a466819ed6d81244e00000000000000000000000000000000000000000000000000000000001312d00 - Advanced Parameters
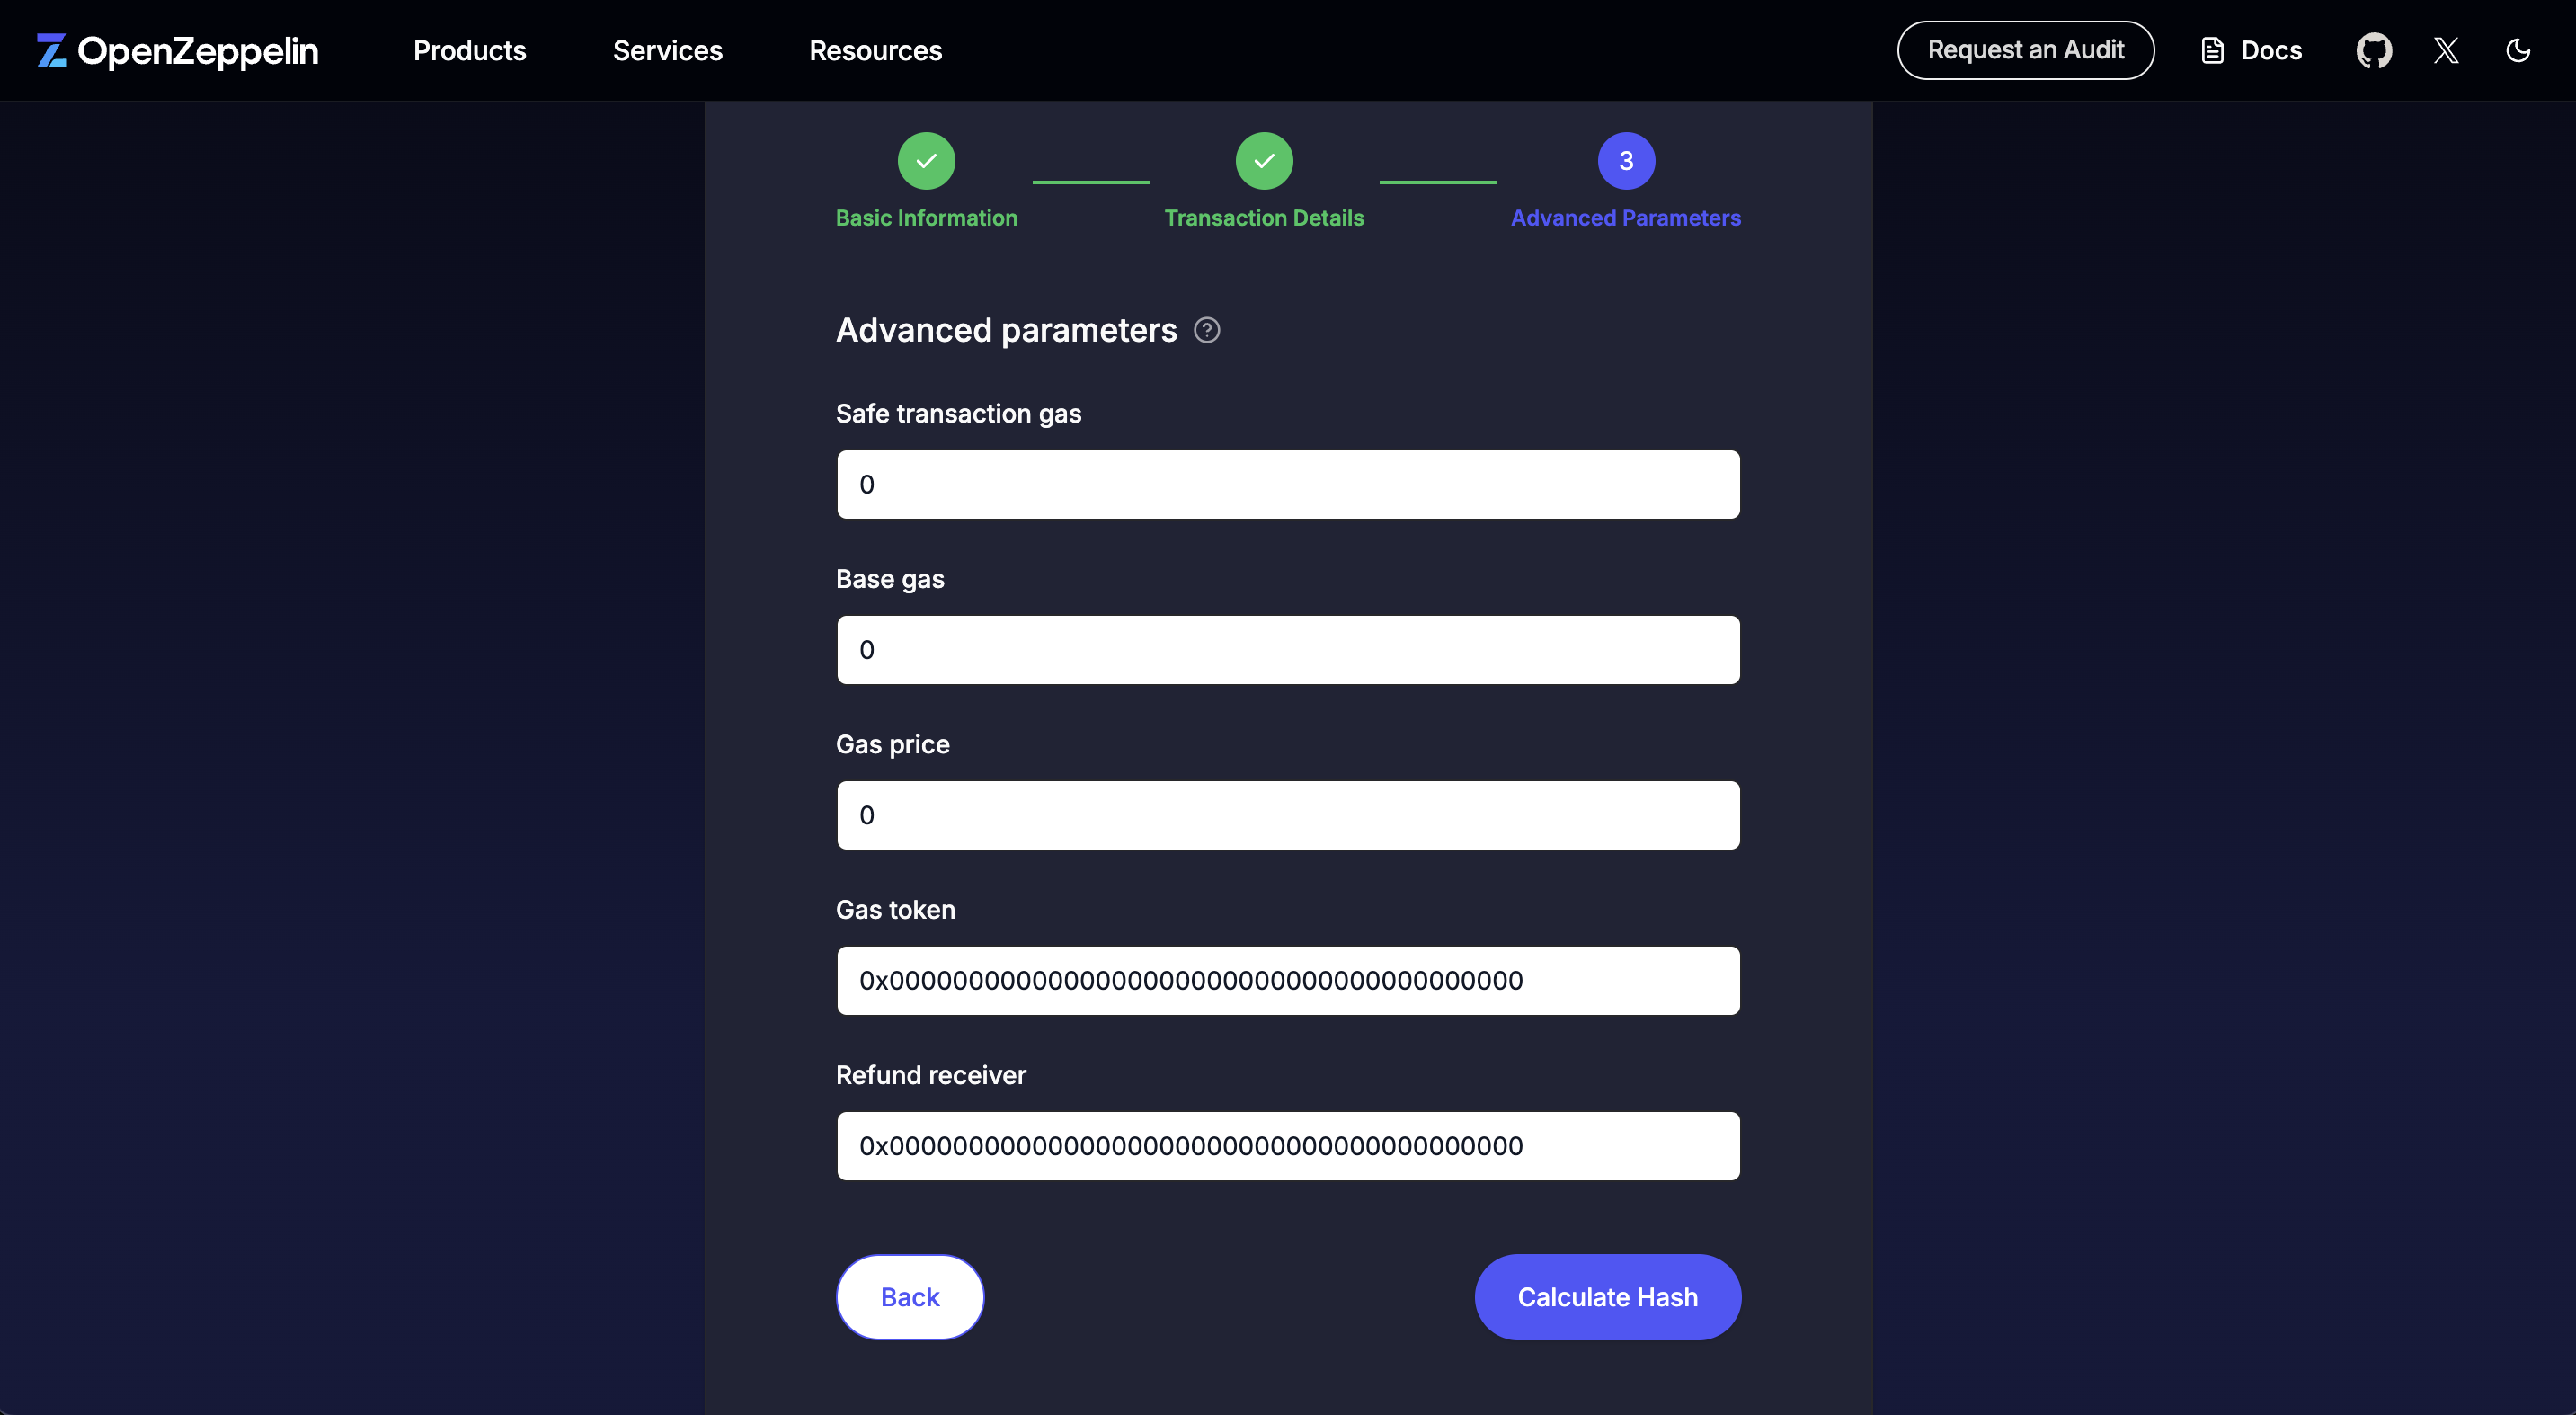
- These parameters can remain as their values.
Finally click on Calculate Hash to see the 'Message Hash' and 'Domain Hash'. These values should match with the ones shown on Safe UI , Liminal Vaults UI and on your ledger while signing the transaction.
Updated about 2 months ago